5.4 3v swap

Chrisg2121

Member
Established Member
Joined
May 21, 2017
Messages
47
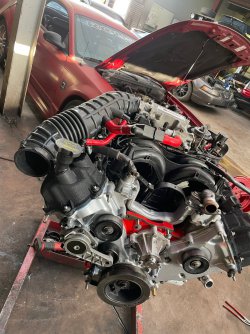
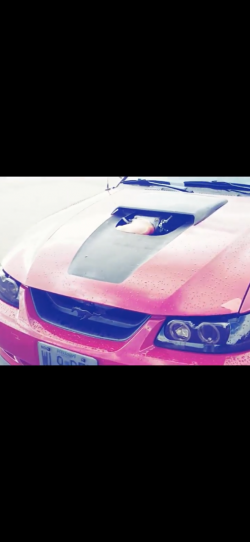
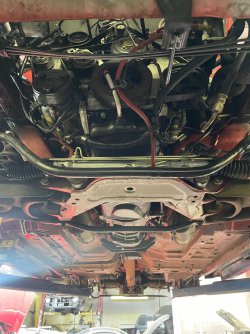
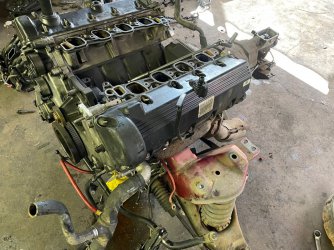
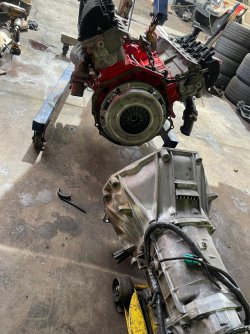
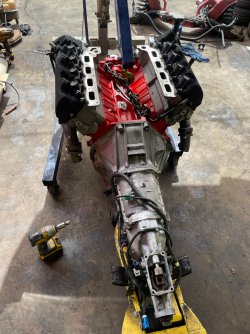
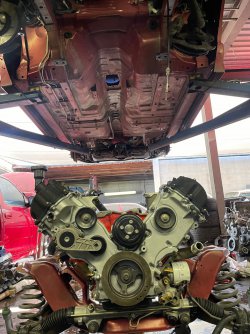
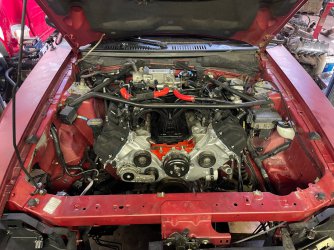
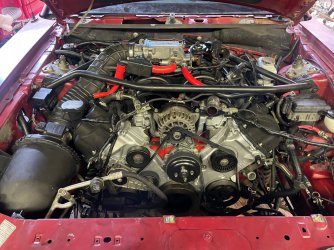
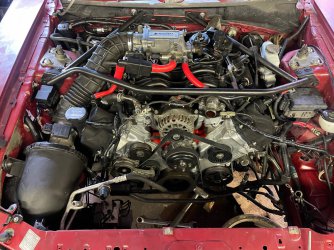
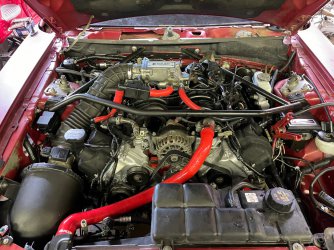
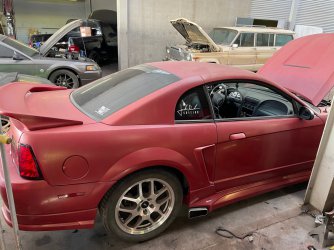
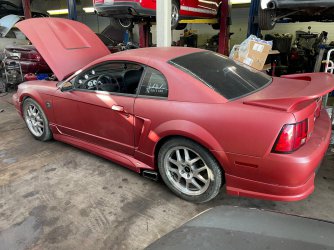
I recently came up on this low mileage 2000 stage 1 roush that had a blown engine. I was looking into 4.6 3v swaps but it seemed that there was no way for that to fit under a stock hood. I decided to use a 5.4 3v
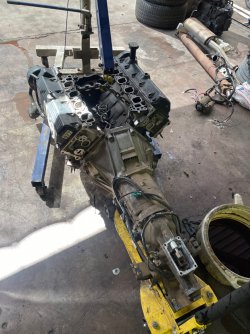
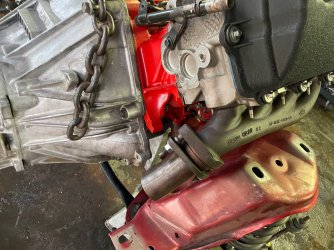
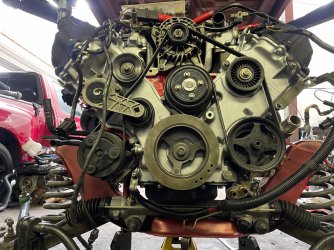
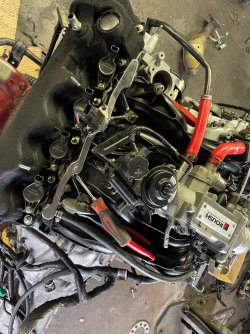
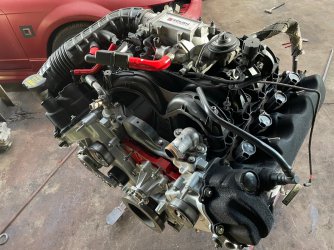
The heads/valve covers are off an 05 mustang, block is a 01 navigator, timing cover is off a 3v f250 since it holds the power steering pump on the block unlike the 3v f150 cover that bolts it to the head
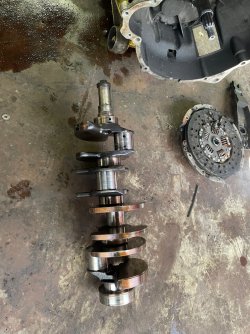
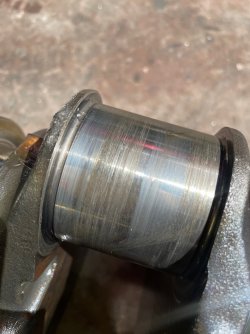
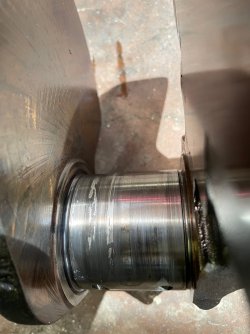
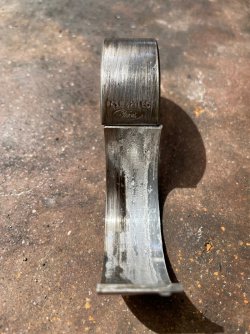
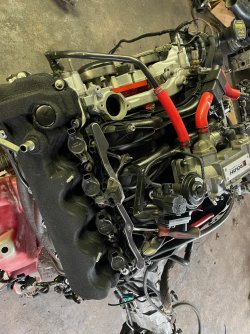
I rebuilt the engine, had the block bored, heads resurfaced, stock bottom end nothing special just needed to be freshened up. Navi pistons n 5.4 3v pistons are both flat tops so compression ratio stays the same as a stock 3v
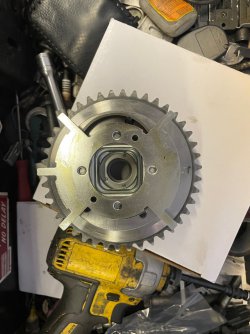
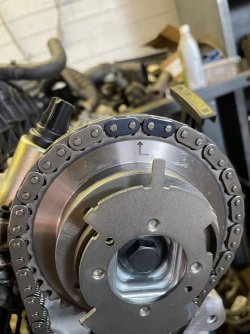
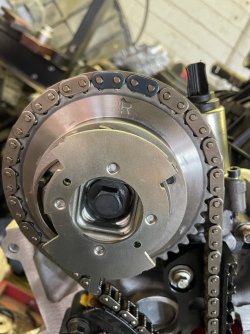
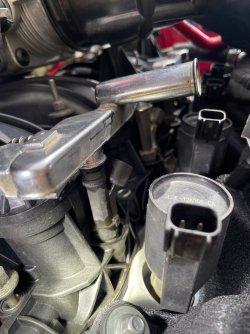
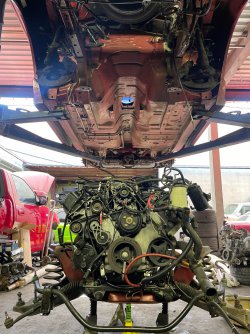
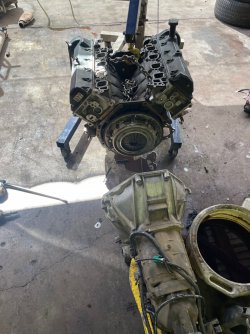
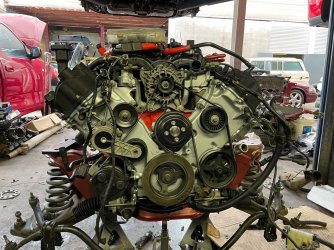
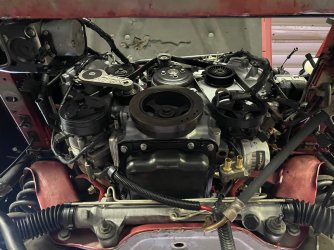
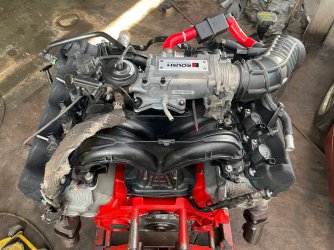
I installed phaser locks to delete the variable cam timing system, I cut the reluctor wheel teeth on both cams down to 1. I will be using the passenger side cam for the sensor so I need to extend the wiring for that. I cut down the vct actuators to shorten them so they won’t stick out the top n capped the hole on the valve covers with freeze plugs
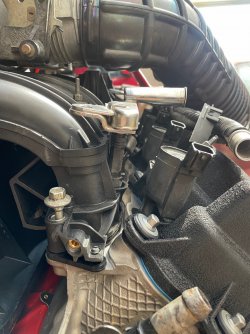
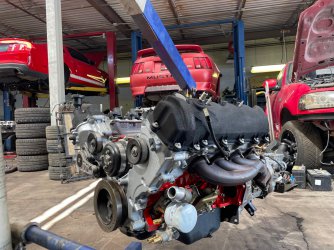
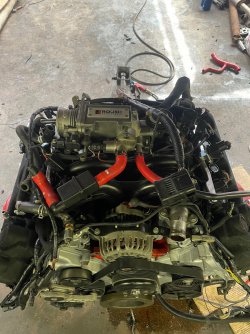
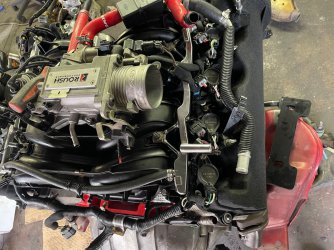
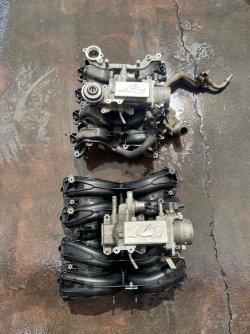
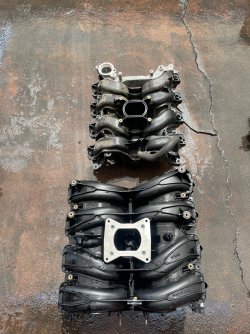
I removed the imrc motor, linkage, n flaps off the 3v intake manifold n sealed it all off
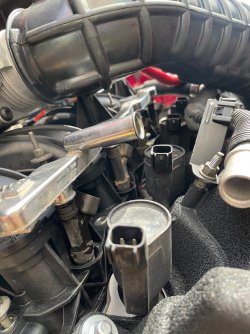
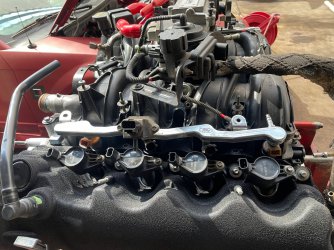
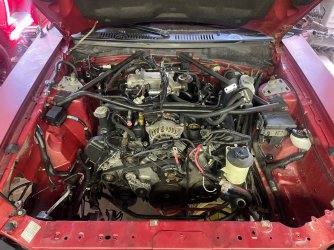
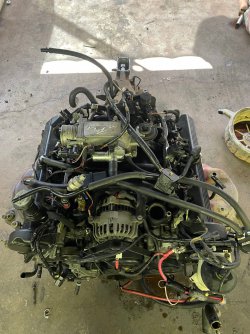
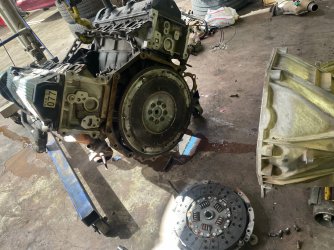
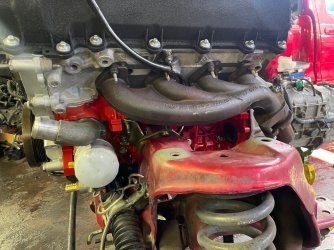
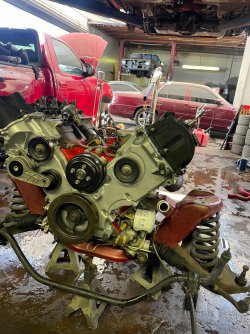
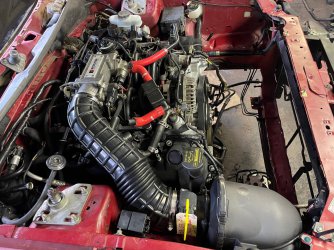
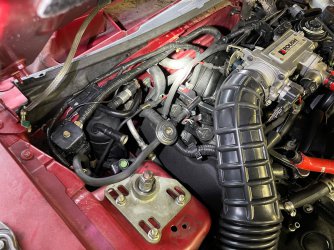
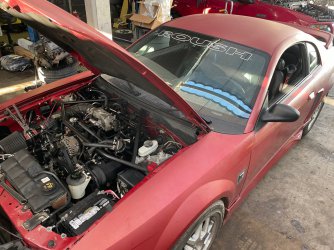
I used a 2v mustang throttle elbow spacer which I heli coiled then studded to be able to bolt the 2v elbow onto the spacer. I then drilled 4 holes on the spacer to bolt it onto the 3v manifold. The intake worked out pretty good I’ll be able to retain the egr just had to weld a bung onto the driver side exhaust manifold n make a new egr tube. I was able to mount the dpfe sensor/egr vac regulator bracket to the 3v manifold close to its stock location. I’ll also retain all stock locations for vacuum lines as well as the idle air control. I’m hoping to be able to fit it under the hood, under the strut tower brace, n with the oem intake tube/air filter housing. I’ll be using the stock 2v fuel rails/injectors just have to modify them to mount to the 3v manifold
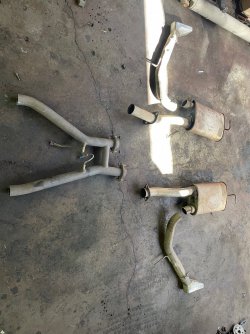
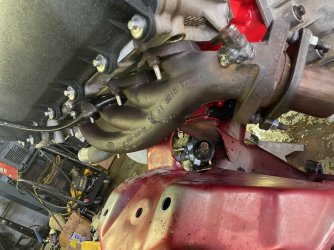
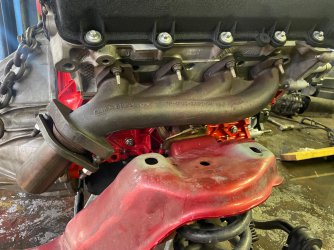
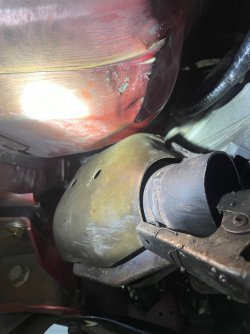
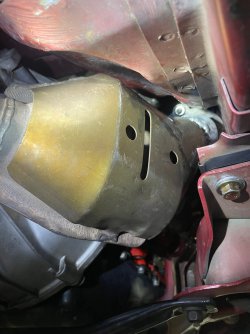
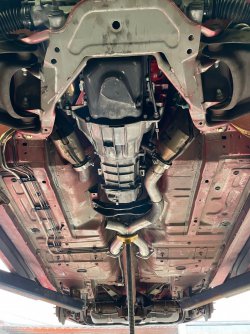
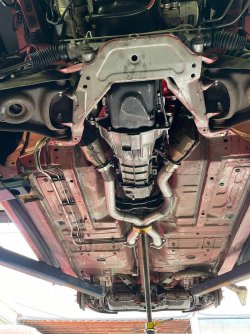
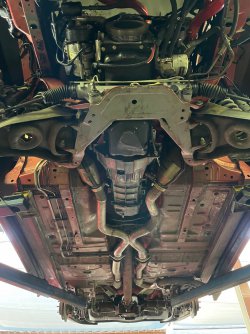
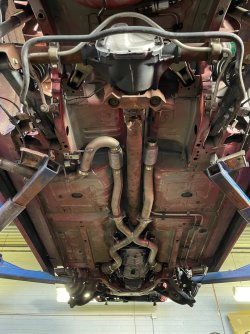
I’m using oem mustang 4.6 3v exhaust manifolds which I’ll have to cut n weld my cats to fit the different flanges but they seem to be around the same angle. Also the driver side manifold is tucked nice so it should clear the steering shaft
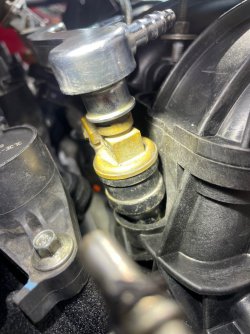
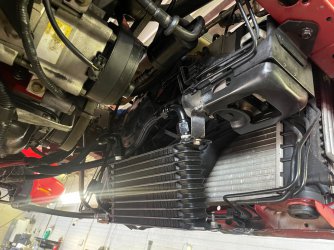
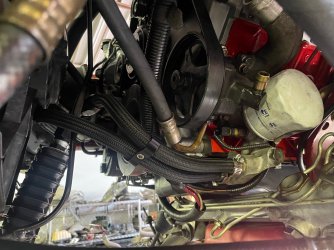
I welded a bung for the coolant sensor onto the 3v coolant crossover. The 2v thermostat housing fits the 3v coolant crossover it lines up the same way as the 2v so no need to mess with the upper hose. For the lower I used a crown Vic oil filter housing that I believe are off the cop cars with the big oil cooler ports they use oring type fittings but I tapped n installed some 5/8 barb fittings for an air to oil cooler. The crown Vic filter housing moves the rad hose inlet up some so I’ll have to extend the lower hose up a bit.
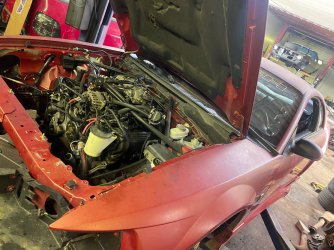
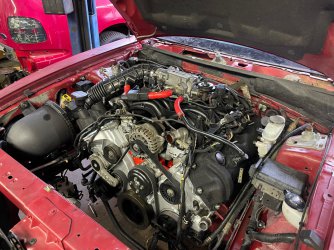
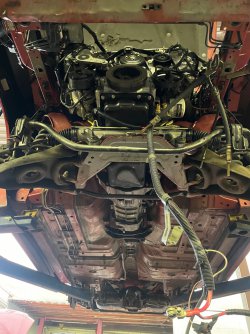
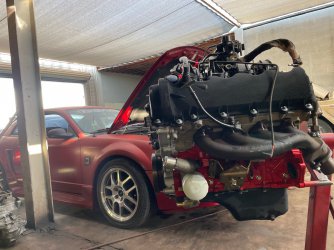
Hoping to start dropping it in next weekend I’ll keep this updated as I go
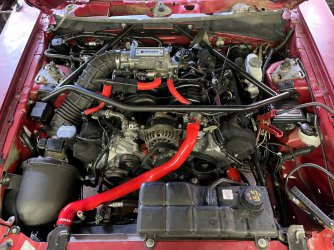
 

Attachments

  • B7369971-2DFC-4A9D-A3D6-F5D2D016449B.jpeg
    B7369971-2DFC-4A9D-A3D6-F5D2D016449B.jpeg
    321.5 KB · Views: 516
  • 8D0D39B0-FE03-4FA1-96DE-D97B25FB65E1.jpeg
    8D0D39B0-FE03-4FA1-96DE-D97B25FB65E1.jpeg
    375.3 KB · Views: 234
  • D7099EC5-E867-4BC7-9BBE-EC93295E68D7.jpeg
    D7099EC5-E867-4BC7-9BBE-EC93295E68D7.jpeg
    431.5 KB · Views: 238
  • 30186FF1-6E64-41F3-B16A-F426EE40B427.jpeg
    30186FF1-6E64-41F3-B16A-F426EE40B427.jpeg
    404.6 KB · Views: 245
  • DF104731-D1F0-49F5-9257-9CBAB0C94EED.jpeg
    DF104731-D1F0-49F5-9257-9CBAB0C94EED.jpeg
    441.1 KB · Views: 236
  • FF855B60-BD54-40B7-9111-B463593A7765.jpeg
    FF855B60-BD54-40B7-9111-B463593A7765.jpeg
    322.3 KB · Views: 225
  • 77401B12-96EE-45E8-B03C-945249460A1B.jpeg
    77401B12-96EE-45E8-B03C-945249460A1B.jpeg
    581.1 KB · Views: 229
  • B6E5B230-1DBC-4E44-9847-A880445217D5.jpeg
    B6E5B230-1DBC-4E44-9847-A880445217D5.jpeg
    553.4 KB · Views: 229

Chrisg2121

Member
Established Member
Joined
May 21, 2017
Messages
47
Before n after pics of cam trigger wheels n another pic of the engine
 

Attachments

  • 86F091D8-D407-4C99-AC7D-A34E261F69D2.jpeg
    86F091D8-D407-4C99-AC7D-A34E261F69D2.jpeg
    281.1 KB · Views: 145
  • 20170394-D114-4ED6-8B4F-64745E524398.jpeg
    20170394-D114-4ED6-8B4F-64745E524398.jpeg
    288.3 KB · Views: 192
  • E98611D7-C6BF-4DE6-A14B-EBAF80680D47.jpeg
    E98611D7-C6BF-4DE6-A14B-EBAF80680D47.jpeg
    310.9 KB · Views: 144
  • BF567894-5F92-45B0-9748-CFD8CD561FD8.jpeg
    BF567894-5F92-45B0-9748-CFD8CD561FD8.jpeg
    430.8 KB · Views: 158

BlackStang00

Active Member
Established Member
Joined
Sep 6, 2011
Messages
248
Location
Naples,Fl
Pretty cool swap. I’m curious why the 4.6 3v wouldn’t fit, it’s been done before and I’m pretty sure people have used the stock hood.


Sent from my iPhone using Tapatalk
 

Chrisg2121

Member
Established Member
Joined
May 21, 2017
Messages
47
Pretty cool swap. I’m curious why the 4.6 3v wouldn’t fit, it’s been done before and I’m pretty sure people have used the stock hood.


Sent from my iPhone using Tapatalk
I only saw one 4.6 3v swap where the stock hood was used. They had to cut a hole to clear the manifold it looks clean but I didn’t want to cut or replace my hood. It seems that it’s just too tall right at the front where the intake sits above the alternator. With the 5.4 3v I was able to keep the throttle elbow pretty much where the 2v holds it so I’m hoping I won’t have any hood clearance issues.
 

Attachments

  • 8B53E4DE-B173-4A29-8C1F-5F4D0052E98B.png
    8B53E4DE-B173-4A29-8C1F-5F4D0052E98B.png
    1.7 MB · Views: 127

Chrisg2121

Member
Established Member
Joined
May 21, 2017
Messages
47
Stock chubby injectors won’t fit properly. Injector doesn’t sit straight. I have some ev14 injectors that fit so I’ll have to replace the injector pigtails but the gt 2v fuel rails fits the 3v manifold nice just need to make some hold down brackets
 

Attachments

  • 7629977E-E1CE-4A7C-AEBE-C68B4958F2BD.jpeg
    7629977E-E1CE-4A7C-AEBE-C68B4958F2BD.jpeg
    279.4 KB · Views: 126
  • 7A1CEB08-BA32-4848-98C2-107B0B3C1CB1.jpeg
    7A1CEB08-BA32-4848-98C2-107B0B3C1CB1.jpeg
    355.5 KB · Views: 128
  • EE0E441B-91D2-4F05-930D-C8AD539F8586.jpeg
    EE0E441B-91D2-4F05-930D-C8AD539F8586.jpeg
    346 KB · Views: 145
  • 66544103-17E7-4684-A4F8-3B3565A6620D.jpeg
    66544103-17E7-4684-A4F8-3B3565A6620D.jpeg
    323.4 KB · Views: 135
  • 2C0FC18E-4C7D-4F81-8B74-05265D006C4E.jpeg
    2C0FC18E-4C7D-4F81-8B74-05265D006C4E.jpeg
    305.7 KB · Views: 135
  • E30EC6E8-09A4-4E1B-8A6B-C54C0ACF7CD9.jpeg
    E30EC6E8-09A4-4E1B-8A6B-C54C0ACF7CD9.jpeg
    456 KB · Views: 132

BlackStang00

Active Member
Established Member
Joined
Sep 6, 2011
Messages
248
Location
Naples,Fl
Oh ok I see what you’re saying, I didn’t think that was an issue.

Looks like you’ve made pretty good progress. Keep it up.


Sent from my iPhone using Tapatalk
 

Chrisg2121

Member
Established Member
Joined
May 21, 2017
Messages
47
Started pulling the engine today should be out soon.
I’ll probably delete the mufflers since the inlet on the passenger side one is busted out n so far the only same side in/out mufflers I can find are about 180 each. Also deleted the secondary cats n cut the h pipe off to replace with a 2.5 x pipe
 

Attachments

  • BC4AB85D-2523-4CE4-A179-0CCB9B3F0993.jpeg
    BC4AB85D-2523-4CE4-A179-0CCB9B3F0993.jpeg
    432.1 KB · Views: 121
  • 872714C0-18D7-4885-94E3-E7BB9DDA979D.jpeg
    872714C0-18D7-4885-94E3-E7BB9DDA979D.jpeg
    396.1 KB · Views: 131
  • 388D9C1E-0134-4A4F-9DCF-C861B977033A.jpeg
    388D9C1E-0134-4A4F-9DCF-C861B977033A.jpeg
    355.8 KB · Views: 117
  • FD2FB5ED-320D-45B9-B6E6-F135C643CE93.jpeg
    FD2FB5ED-320D-45B9-B6E6-F135C643CE93.jpeg
    397.1 KB · Views: 122

BlackStang00

Active Member
Established Member
Joined
Sep 6, 2011
Messages
248
Location
Naples,Fl
Are you going to sell parts off the motor? Id be interested in a few things.

I agree the intake is pretty badass.


Sent from my iPhone using Tapatalk
 

Chrisg2121

Member
Established Member
Joined
May 21, 2017
Messages
47
Im sure that I’ll have some stuff to sell let me know what you’re interested in.
Yea the intake spacer/adapter worked out a lot better than I thought it would hopefully everything fits under the hood n strut tower brace

I got the drivetrain out just need to separate it hoping to have all that done today
I’m waiting on the clutch I ordered I think it’ll be here Tuesday.
I just noticed this is a Windsor 4.6 if I remember correctly the early ones had 8 bolt flywheels. I’m hoping it does since it’ll save me some money
Also noticed that the sticker at the rear of the passenger side head says 5.4 9/17/99. Valve cover says 4.6 9/19/99. So either someone was messing around or Windsor heads must have been labeled as 5.4 from the factory that’s a trip lol
I’ll most likely be going with a cobra front bumper for it since I couldn’t find any of the roush front bumper trim pieces that go on both sides n I wasn’t digging the bare gt front bumper. But if anyone knows where to get those trim pieces let me know it’s on one of the pics.
Previous owner also gave me that magazine board when I bought the car it was featured in it long ago
It had a vortech supercharger but was not included in the sale so that’s why I decided to go 5.4 on this
The wheels off the pic weren’t on it either it came with gt500 wheels which look kind of weird to me. I’m searching for roush wheels but not much luck locally. But luckily all the suspension n drivetrain upgrades mentioned on there are still intact
The magazine also says it had 30lb injectors but when I got it it had 42lb lightning ones on it n ran like shit. Also had a slight rod knock n smoked like a chimney. I ended up putting stock injectors in it limped it to Ford since they’re down the street from me n had the computer flashed back to stock
Once I picked it up it ran better still had a slight misfire at idle still had the rod knock n smoking just alot less smoke. But it ran good at high rpms lol
So old engine is no good but I’ll sell pretty much anything off it that I don’t use
 

Attachments

  • 779339B4-DC27-48BC-9EB0-9EDBCD9B8E65.jpeg
    779339B4-DC27-48BC-9EB0-9EDBCD9B8E65.jpeg
    462.4 KB · Views: 115
  • DFD36957-8739-4206-A930-6DB265FA69E4.jpeg
    DFD36957-8739-4206-A930-6DB265FA69E4.jpeg
    446.2 KB · Views: 112
  • 8C542BCE-E9EB-4897-9C3A-2D05F46833C7.jpeg
    8C542BCE-E9EB-4897-9C3A-2D05F46833C7.jpeg
    432.8 KB · Views: 118
  • E30A11BB-FE41-43F7-9AF1-0EBB1AF65C60.jpeg
    E30A11BB-FE41-43F7-9AF1-0EBB1AF65C60.jpeg
    471.1 KB · Views: 112
  • 7ABB37BD-78B9-407A-9C70-61BDA0337AAA.jpeg
    7ABB37BD-78B9-407A-9C70-61BDA0337AAA.jpeg
    365.6 KB · Views: 110
  • C25B1B4B-733E-469A-B3D9-1CBB52E2967D.jpeg
    C25B1B4B-733E-469A-B3D9-1CBB52E2967D.jpeg
    348.2 KB · Views: 106
  • 12B82184-E222-44D3-9A94-0B9EB189D334.jpeg
    12B82184-E222-44D3-9A94-0B9EB189D334.jpeg
    337.6 KB · Views: 114
  • A3A8AA14-0105-4D7D-B718-F7A677109F4B.jpeg
    A3A8AA14-0105-4D7D-B718-F7A677109F4B.jpeg
    479.1 KB · Views: 119
  • 57142084-91BB-437A-9CDD-4D8BD4467D48.jpeg
    57142084-91BB-437A-9CDD-4D8BD4467D48.jpeg
    350.8 KB · Views: 117

Chrisg2121

Member
Established Member
Joined
May 21, 2017
Messages
47
Got the motor n trans separated. Won’t be needing a flywheel it has a lightly used aluminum one on it.
I also tore the engine down to get the crank out. Forged crank with some damaged journals. If anyone is interested I’d sell it for $500+ shipping
I’ll start getting it back together once my clutch shows up tracking updated to Saturday for delivery
 

Attachments

  • AAF46E8C-39E3-49CA-840D-FB9022EF1CC8.jpeg
    AAF46E8C-39E3-49CA-840D-FB9022EF1CC8.jpeg
    400.9 KB · Views: 96
  • 9DC10A42-9077-4687-8814-6761EAB8448D.jpeg
    9DC10A42-9077-4687-8814-6761EAB8448D.jpeg
    380.5 KB · Views: 99
  • 6AAF2994-6159-453C-B24E-E5B805F32B7F.jpeg
    6AAF2994-6159-453C-B24E-E5B805F32B7F.jpeg
    401.6 KB · Views: 107
  • 1DDF7F79-1D4E-4E44-85A9-4D7F093C612E.jpeg
    1DDF7F79-1D4E-4E44-85A9-4D7F093C612E.jpeg
    464.1 KB · Views: 105
  • 9FC56EDA-2D17-4641-8765-DDB02B49A032.jpeg
    9FC56EDA-2D17-4641-8765-DDB02B49A032.jpeg
    322.8 KB · Views: 89
  • 6E6EFD57-9C74-4E7F-93C7-BC60165626CA.jpeg
    6E6EFD57-9C74-4E7F-93C7-BC60165626CA.jpeg
    247.2 KB · Views: 85
  • 668432C5-0E5D-422E-8EB9-FB8C74A1C477.jpeg
    668432C5-0E5D-422E-8EB9-FB8C74A1C477.jpeg
    302.5 KB · Views: 94
  • A09A47EB-E07A-483D-8517-03253F94DF64.jpeg
    A09A47EB-E07A-483D-8517-03253F94DF64.jpeg
    245.2 KB · Views: 87
  • 64695324-F401-468B-BF8C-2197112A51E0.jpeg
    64695324-F401-468B-BF8C-2197112A51E0.jpeg
    255.2 KB · Views: 90
  • D7C94110-8658-4896-95E2-78DA1F56F802.jpeg
    D7C94110-8658-4896-95E2-78DA1F56F802.jpeg
    399.3 KB · Views: 89

Chrisg2121

Member
Established Member
Joined
May 21, 2017
Messages
47
Got the new clutch in today used the old flywheel n got the 5.4 mated to the trans
Also got it all set back down on the k member just need to start attaching accessories. Exhaust manifold seems like it should clear the steering shaft
 

Attachments

  • 8D6C7F5A-F345-4E83-A3E6-C9C882A4D14B.jpeg
    8D6C7F5A-F345-4E83-A3E6-C9C882A4D14B.jpeg
    450.8 KB · Views: 121
  • 1B6C4A79-333E-45C9-A3E7-529CAC690426.jpeg
    1B6C4A79-333E-45C9-A3E7-529CAC690426.jpeg
    431.6 KB · Views: 133
  • E813C268-0714-4A75-8584-EF07F2278CCD.jpeg
    E813C268-0714-4A75-8584-EF07F2278CCD.jpeg
    414.5 KB · Views: 122
  • 72BEC8A3-B497-419E-BE14-194C59F682C1.jpeg
    72BEC8A3-B497-419E-BE14-194C59F682C1.jpeg
    390 KB · Views: 124
  • 181EC3E1-A129-4498-B9CD-92EC6BC9C388.jpeg
    181EC3E1-A129-4498-B9CD-92EC6BC9C388.jpeg
    497.7 KB · Views: 134
  • B82B34A9-A588-4240-8CF4-6A52AF6E76A2.jpeg
    B82B34A9-A588-4240-8CF4-6A52AF6E76A2.jpeg
    328.1 KB · Views: 121
  • 96574F46-7673-4329-99FA-BA49B43012A8.jpeg
    96574F46-7673-4329-99FA-BA49B43012A8.jpeg
    401 KB · Views: 111
  • B17DAFA0-1070-4306-B65E-70F2652B45C1.jpeg
    B17DAFA0-1070-4306-B65E-70F2652B45C1.jpeg
    392.8 KB · Views: 118
  • 942339E0-9A40-4422-8493-E6511C0C7ECB.jpeg
    942339E0-9A40-4422-8493-E6511C0C7ECB.jpeg
    386 KB · Views: 115

BlackStang00

Active Member
Established Member
Joined
Sep 6, 2011
Messages
248
Location
Naples,Fl
It looks like it’s coming along nicely! Is that a marauder in the background? Those are cool cars.


Sent from my iPhone using Tapatalk
 

Chrisg2121

Member
Established Member
Joined
May 21, 2017
Messages
47
I lowered the car down just to see how it all fits. Seems good all around, egr tube might be tight by the strut tower brace also may do a 1/2” k member spacer since it’s tight with the hood shut. But the hood does shut. Still need to get the wiring harness on to see where I’ll need to modify it. Also need to make some brackets for the fuel rails n attach the accessories
 

Attachments

  • 6B51DD20-0B9D-454B-AC63-8F2ECCDA550E.jpeg
    6B51DD20-0B9D-454B-AC63-8F2ECCDA550E.jpeg
    424 KB · Views: 114

Chrisg2121

Member
Established Member
Joined
May 21, 2017
Messages
47
Got the wiring done. Also swapped the iac for a crown Vic one it holds the connector out straight facing the throttle body instead of pointing it upwards towards the hood. Got all the accessories on n belt installed.
Also got the fuel rail held down n extended wiring for the cam sensor, dpfe sensor, n egr vac regulator. The rest of the harness was left alone. I got some adapter plugs for the injectors so I didn’t have to rewire those.
Should be ready to drop the car down on it hopefully get it running soon. Need to do some customer work tomorrow then I’ll be back on this after.
 

Attachments

  • 041F8DEF-18FF-41F7-9BF3-0084A1AE6A54.jpeg
    041F8DEF-18FF-41F7-9BF3-0084A1AE6A54.jpeg
    446.8 KB · Views: 121
  • AD1AD8B4-95F8-4AB5-8944-54BE86133298.jpeg
    AD1AD8B4-95F8-4AB5-8944-54BE86133298.jpeg
    424.2 KB · Views: 107
  • 836F795B-6992-4E3C-953B-BBBAC3D220AA.jpeg
    836F795B-6992-4E3C-953B-BBBAC3D220AA.jpeg
    494.1 KB · Views: 115
  • 30121CD9-91FD-4175-A9D3-CDEE3072D003.jpeg
    30121CD9-91FD-4175-A9D3-CDEE3072D003.jpeg
    434.3 KB · Views: 97
  • E42D619F-7B13-4C99-BFB7-54D22979698F.jpeg
    E42D619F-7B13-4C99-BFB7-54D22979698F.jpeg
    463.3 KB · Views: 98
  • BF03FEAA-D4DA-4E8B-B9F3-18AA13AD8190.jpeg
    BF03FEAA-D4DA-4E8B-B9F3-18AA13AD8190.jpeg
    464.2 KB · Views: 114

Chrisg2121

Member
Established Member
Joined
May 21, 2017
Messages
47
Got it together for the most part. Ended up using the 1/2” k member spacers. I was able to reuse the mustang heater hoses with some small modifications. The intake tube n air filter fit perfect even around the strut tower brace. Also got the oil cooler mounted n plumbed.
Waiting on new rad hoses, then have to weld up the exhaust after that I should be able to start it
 

Attachments

  • 4E356A4F-6A1C-4974-BD5C-4FD56B50FBB1.jpeg
    4E356A4F-6A1C-4974-BD5C-4FD56B50FBB1.jpeg
    431.4 KB · Views: 303
  • F5D96EF5-DF86-4D2F-8B59-CBF02E1229C6.jpeg
    F5D96EF5-DF86-4D2F-8B59-CBF02E1229C6.jpeg
    451.5 KB · Views: 119
  • 4F734073-3025-442F-B28C-0FB7148BF3CA.jpeg
    4F734073-3025-442F-B28C-0FB7148BF3CA.jpeg
    441.4 KB · Views: 111
  • 1CE8A8F8-3C9A-4737-96DF-A5BEBF30F6C3.jpeg
    1CE8A8F8-3C9A-4737-96DF-A5BEBF30F6C3.jpeg
    438.2 KB · Views: 108
  • 441ED191-3B83-43C3-87F1-C9769EA8C19E.jpeg
    441ED191-3B83-43C3-87F1-C9769EA8C19E.jpeg
    367.2 KB · Views: 129
  • 0075BDB5-8EEE-43BA-AF9E-BBCE94A8434D.jpeg
    0075BDB5-8EEE-43BA-AF9E-BBCE94A8434D.jpeg
    346.9 KB · Views: 111
  • 9A7DBAA6-4658-419A-8484-603E1937C490.jpeg
    9A7DBAA6-4658-419A-8484-603E1937C490.jpeg
    439.9 KB · Views: 107
  • 0BE2730F-EA74-464A-81EF-78EF6192EEB0.jpeg
    0BE2730F-EA74-464A-81EF-78EF6192EEB0.jpeg
    438.7 KB · Views: 108
  • F7E520CD-87DD-4C4F-BCFD-209CF773A011.jpeg
    F7E520CD-87DD-4C4F-BCFD-209CF773A011.jpeg
    351.7 KB · Views: 119
  • 3B55831D-C132-498D-BCC7-EC51A371B3B4.jpeg
    3B55831D-C132-498D-BCC7-EC51A371B3B4.jpeg
    332.5 KB · Views: 120

Chrisg2121

Member
Established Member
Joined
May 21, 2017
Messages
47
Got the cats on with the front o2s installed also got the radiator on there n filled it with water, filled the engine with oil n it started up after a few tries. It’s definitely got a vacuum leak at the bottom of the intake manifold not sure if it’s a port I forgot to plug off or if there’s any damage on the manifold itself the vacuum leak is coming from the lowest part of the manifold so I’ll have to pull it off to inspect it.
 

Attachments

  • 4B6842B2-0E06-42E9-A954-A657D6A583C1.jpeg
    4B6842B2-0E06-42E9-A954-A657D6A583C1.jpeg
    253.5 KB · Views: 95
  • F86B5D0C-ED0A-44EC-8CCC-840B83B6C3B9.jpeg
    F86B5D0C-ED0A-44EC-8CCC-840B83B6C3B9.jpeg
    285.3 KB · Views: 97
  • 29C48E05-B25F-4D72-9FC9-673121EB6F86.jpeg
    29C48E05-B25F-4D72-9FC9-673121EB6F86.jpeg
    307 KB · Views: 120
  • 87C694FA-4D4F-4A2F-9EC6-FAE763C3176F.jpeg
    87C694FA-4D4F-4A2F-9EC6-FAE763C3176F.jpeg
    399.8 KB · Views: 104
Last edited:

Chrisg2121

Member
Established Member
Joined
May 21, 2017
Messages
47
Found my vacuum leak i accidentally drilled too far on the passenger side when I was drilling out a hole to install a freeze plug to close the vacuum port for the evap purge valve hose on the 5.4 manifold. Ended up plugging it from underneath as well runs a lot better no dtcs so far after getting the vacuum leak fixed n the rear o2s installed
Got started on the exhaust. Used as much as the old stuff as I could n a few scrap pieces I had laying around. Secondary cats were deleted, x pipe was installed, used some v band clamps, some flex pipes n mufflers were deleted. Should have the exhaust done soon. I kept the stock tips but they’re a bit dinged up so I’m looking for new ones no luck finding the same tapered rectangle style though so I might do dual lightning style tips on each side if those fit good
I’m also going to rip the stereo system out of the trunk it’s got a big amplifier in the center small battery box in place of the spare tire n I think crossovers on the sides? Then a big sub box between that amplifier case n the back seat
I’m going to try to make the subs in that box work with a different amp mounted elsewhere probably the back seat when I delete it, get rid of the crossovers, old amp n try to get the trunk back to stock as much as I can then I will be mounting the battery in the passenger side of the trunk.
I’m waiting on new front/rear control arm bushings, ball joints, tie rods, rack bushings, sway bar bushings/links should all be here soon.
I have new front wheel bearings with extended studs n the ftr brake caliper adapter kit with some 14” rotors n s550 4 piston calipers that I’ll be installing as well then I should be ready to put the wheels on n drive it around
Also have to replace the pinion seal n driver side axle seal since they’re leaking I’ll probably do the passenger side one too
 

Attachments

  • 35596357-BB4B-4237-914F-51E3C1C5857F.jpeg
    35596357-BB4B-4237-914F-51E3C1C5857F.jpeg
    435.4 KB · Views: 148
  • 9223963C-DF2A-4387-AFC6-5DBB9E51477C.jpeg
    9223963C-DF2A-4387-AFC6-5DBB9E51477C.jpeg
    448 KB · Views: 101
  • 18ADEC77-947D-4E86-9509-87553BFF3B29.jpeg
    18ADEC77-947D-4E86-9509-87553BFF3B29.jpeg
    371.9 KB · Views: 104
  • 5F6CCACE-DF73-413A-8898-2422735F5C4F.jpeg
    5F6CCACE-DF73-413A-8898-2422735F5C4F.jpeg
    394.2 KB · Views: 133
  • 85EC279D-F9EF-4909-AE57-8B4ED9214A6A.jpeg
    85EC279D-F9EF-4909-AE57-8B4ED9214A6A.jpeg
    382.7 KB · Views: 127
  • E2BA01CB-A130-49F1-9B16-825979D418BA.jpeg
    E2BA01CB-A130-49F1-9B16-825979D418BA.jpeg
    390.1 KB · Views: 113
  • 61CF2C3C-44D1-4DE0-B304-05BDDB6054F2.jpeg
    61CF2C3C-44D1-4DE0-B304-05BDDB6054F2.jpeg
    355 KB · Views: 106
  • 4200E43A-2A47-4B9F-A6A7-BD1A606E1CDD.jpeg
    4200E43A-2A47-4B9F-A6A7-BD1A606E1CDD.jpeg
    358.7 KB · Views: 113
  • CFD3A073-CC5A-4637-93D3-D1E999DEF7CC.jpeg
    CFD3A073-CC5A-4637-93D3-D1E999DEF7CC.jpeg
    341.7 KB · Views: 105
  • F7A32E71-3869-458D-9824-8C5CA2062CE3.jpeg
    F7A32E71-3869-458D-9824-8C5CA2062CE3.jpeg
    353.6 KB · Views: 114
Last edited:

Users who are viewing this thread


Top