You are using an out of date browser. It may not display this or other websites correctly.
You should upgrade or use an alternative browser.
You should upgrade or use an alternative browser.
5.8L GT500 Rod Failure
- Thread starter MrAjsTech
- Start date
Good video.
Looking forward to 5.8 full assembly.
-J
Looking forward to 5.8 full assembly.
-J
I’ve not felt this excitement in the 5.8 community for some time. Andrew get on and video the build and dyno that MF!!
Still waiting on my parts from the US... no where near as extreme as this but this is so inspiring.
Sent from my iPhone using Tapatalk Pro
Still waiting on my parts from the US... no where near as extreme as this but this is so inspiring.
Sent from my iPhone using Tapatalk Pro
I’ve not felt this excitement in the 5.8 community for some time. Andrew get on and video the build and dyno that MF!!
Still waiting on my parts from the US... no where near as extreme as this but this is so inspiring.
Sent from my iPhone using Tapatalk Pro
Just filmed Short Block Assembly. I should have the video out in a day or two! It is pretty. Just waiting on the cams to come in from Comp and Acufab Secondary chains.
Hey guys I split the video of Block prep and Blueprinting and assembly into two videos. We had an issue with the main bearing clearance and had to order some new bearings to get the desired tolerances.
Block Prep and Blue Printing:
Assembly:
We are filming Cam degree tomorrow and should be wrapped up mid next week ready to install the engine in the car!
Block Prep and Blue Printing:
Assembly:
We are filming Cam degree tomorrow and should be wrapped up mid next week ready to install the engine in the car!
I would have no problem with MHS doing an engine for me after seeing his work.
I need to finish the second vid but I’m looking forward to you Dyno tuning that beast.
Good luck.
-J
I need to finish the second vid but I’m looking forward to you Dyno tuning that beast.
Good luck.
-J
I would have no problem with MHS doing an engine for me after seeing his work.
I need to finish the second vid but I’m looking forward to you Dyno tuning that beast.
Good luck.
-J
I just hope my engine build is half as meticulous as this!! Parts should be landing in Australia for mustang motorsport to do the tear down and rebuild in two weeks (lockdowns permitting). They’re the Australian “Shelby America” and happen to be 10 mins down the road
Daym he’s done an outstanding job! Like BiminiLX, so looking forward to the dyno. And some roll racing capers in Mexico!!
Sent from my iPhone using Tapatalk Pro
I would have no problem with MHS doing an engine for me after seeing his work.
I need to finish the second vid but I’m looking forward to you Dyno tuning that beast.
Good luck.
-J
I got talking with Justin and Jordan. Sound like we will be moving forward with some modifications to the lower intake. Stay tuned
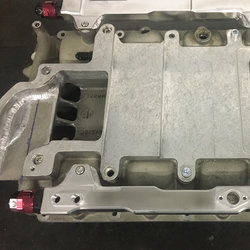
It’s interesting that they’re cutting the entire rear bypass section out. That is the biggest area covering access to the core for cooling/airflow. As you see in the stock pics, that ‘shelf’ bypasses airflow to the internal bypass valve on the supercharger and the ‘wall’ blocks blower discharge air from accessing the core.
As you see in the pics of the black intake on my car, extensive work has been done to fit the KB Bigun core then cut out the ‘wall and shelf’, with welding in a new plate to keep the area for the bypass.
It would be awesome to just cut that whole area out.
When I’ve talked to Justin, we discussed this and me sending in my stock lower intake to fit the new VMP core and max port the lower, potentially cutting out that whole bypass shelf to give full unrestricted access of blower air to the core.
Hopefully that’s what you can accomplish as I believe you’ll the same fully ported 3R I do.
Here is a pic of the stock intake and the modified black (heat resistant paint) KB equipped intake on my car.
-J
View attachment 1634017 View attachment 1634018 View attachment 1634016 View attachment 1634014 View attachment 1634014 View attachment 1634015 That is good you’re addressing the biggest restriction (lower intake and intercooler core).
It’s interesting that they’re cutting the entire rear bypass section out. That is the biggest area covering access to the core for cooling/airflow. As you see in the stock pics, that ‘shelf’ bypasses airflow to the internal bypass valve on the supercharger and the ‘wall’ blocks blower discharge air from accessing the core.
As you see in the pics of the black intake on my car, extensive work has been done to fit the KB Bigun core then cut out the ‘wall and shelf’, with welding in a new plate to keep the area for the bypass.
It would be awesome to just cut that whole area out.
When I’ve talked to Justin, we discussed this and me sending in my stock lower intake to fit the new VMP core and max port the lower, potentially cutting out that whole bypass shelf to give full unrestricted access of blower air to the core.
Hopefully that’s what you can accomplish as I believe you’ll the same fully ported 3R I do.
Here is a pic of the stock intake and the modified black (heat resistant paint) KB equipped intake on my car.
-J
There are total of 3 areas within the lower intake manifold to remove restrictions.
I refer them as stage 1, stage 2, and stage 3 portings.
Hi James what you did is ONLY stage 1 porting. You are still missing the stage 2 and stage 3 portings. Very very few people have done all the stage 1, 2, & 3 porting.
What’s that second CAD like drawing?
How you liking the 350 Manny?
Hopefully the monster 500 done soon man.
-J
How you liking the 350 Manny?
Hopefully the monster 500 done soon man.
-J
Hey J ya the CAD is of the 3D printed elbow that’s gonna be used on the manifold for my wastegate Shawn use to weld them in pieces now he uses a one piece design, gt500 is ready to get take. To Shawn for him to finish, the gt350 is nice but I want more power lolWhat’s that second CAD like drawing?
How you liking the 350 Manny?
Hopefully the monster 500 done soon man.
-J
Attachments
That cam degree video is top notch. I certainly would never have the patience for that. So, human nature being what it is I wonder how many times Jordan have spent major time degreeing cams and got it close (like .5 degree off or closer) and just say...………………..good enough it'll still run great and the owner won't know the difference. LOL
So, in the video he installed the heads and torqued them just to 30 ft.lbs. install the cams then mentions the 2 checker springs in the 1 cyl on the head and degrees the cam. Does he not have to remove the cams again to remove those checker springs and install the proper springs.
What about the rest of the cyl. head torqueing procedure? Does he continue the process of torqueing down the heads or does he remove the heads and puts in 2 new head gaskets for the proper final head torqueing?
I don’t have all of the answers for you yet. But it’s my understanding that the cam timing is set and won’t change as long as the cam gears aren’t loosened. We are filming Saturday the process of removing heads, checker springs, and then final assembly all the way to valve covers.That cam degree video is top notch. I certainly would never have the patience for that. So, human nature being what it is I wonder how many times Jordan have spent major time degreeing cams and got it close (like .5 degree off or closer) and just say...………………..good enough it'll still run great and the owner won't know the difference. LOL
So, in the video he installed the heads and torqued them just to 30 ft.lbs. install the cams then mentions the 2 checker springs in the 1 cyl on the head and degrees the cam. Does he not have to remove the cams again to remove those checker springs and install the proper springs.
What about the rest of the cyl. head torqueing procedure? Does he continue the process of torqueing down the heads or does he remove the heads and puts in 2 new head gaskets for the proper final head torqueing?
This is the only way he wouldn't retain all that work. You can remove the head with the cams and secondary chains in place. I think you can remove the primary chain without loosening the primary sprocket (which would loosed the secondary sprocket in the process), by removing the tensioner and the tensioner arm, although I've never attempted it. I'll be interested to see how that works out.I don’t have all of the answers for you yet. But it’s my understanding that the cam timing is set and won’t change as long as the cam gears aren’t loosened. We are filming Saturday the process of removing heads, checker springs, and then final assembly all the way to valve covers.
This is the only way he wouldn't retain all that work. You can remove the head with the cams and secondary chains in place. I think you can remove the primary chain without loosening the primary sprocket (which would loosed the secondary sprocket in the process), by removing the tensioner and the tensioner arm, although I've never attempted it. I'll be interested to see how that works out.
We have a video coming on the final Assembly and he shows how to remove the cams while retaining the cam timing.
Users who are viewing this thread
Total: 4 (members: 0, guests: 4)


