96dreamer's Never Ending Build Thread

96dreamer

Well-Known Member
Established Member
Joined
Feb 22, 2007
Messages
2,238
Location
St.Louis
Over the winter I took the plunge in replacing the rest of the fuel system. Ended up going with a fuelab 42401 pump with fuelab pre and post filters. Plan was a glenns performance sleeper tank feeding a -10 supply to an inline motion raceworks e85 sensor block to the fuelab regulator I had already installed returning to the tank with -8, everything in e85 safe ptfe line.
20201203_164644.jpg
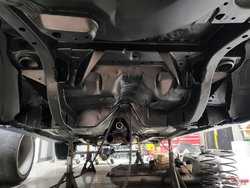
Problems started pretty quick, Glenns tank put the feed straight into the exhaust.
20210306_165921.jpg 20210306_165932.jpg
I ended up cutting it off and having a piece of bent 90° tubing welded on to send the output away from the exhaust but forgot to grab pictures. Unfortunately I also found some rust when I pulled the tank which snowballed into another project entirely. Most of it was just surface rust under the car but I found one section under the driver impact absorber mount that was pretty bad. I ended up cutting it out and replacing it.
20210316_164824.jpg20210316_164838.jpg 20210317_194447.jpg
From there the snowballing continued. I tapped off the back half of the car and set up a proper redneck paint booth.
20210321_163337.jpg 20210321_181953.jpg
Spent a while wire wheeling/ sanding from the lower control arm mount back and got it prepped it for primmer.
20210321_163347.jpg
Two coats of primer later and were looking like this
20210322_181829.jpg
 

96dreamer

Well-Known Member
Established Member
Joined
Feb 22, 2007
Messages
2,238
Location
St.Louis
I ended up using a tractor and implement paint for the primer and satin black top coat. The top coat uses a catalyst hardener and should be a pretty durable coating for the bottom of the car, especially considering I never drive the damn thing.
1681809-625d00c51a22f7429c70f13029f857b2.jpg
1681810-1bfc62e816242a7d1b011bc02f1418e1.jpg


20210329_203222_1.jpg
With the bottom of the car taken car of I was able to start working on the fuel pump mock up. I was worried about the pump being to loud since this is a 95% a street car so i bought some rubber vibration isolators to mounts the pump and filters to.
20210307_145225_1.jpg
I wanted to mount the pump and filters on the front of the tank behind the axle rather. I planned on using a stainless plate to avoid any corrosion issues down the road. Ended up with this arrangement after a few iterations. You can also see the new feed arrangement from the tank in this picture.
20210331_215753_1.jpg
The stainless plate I had to mount the pump assembly to was spaced off the tank the same amount the isolators were to get an accurate position. I marked the positions of everything then drilled and tapped everything in the drill press.
20210401_161101_1.jpg
Tapping the plate allowed me to thread all of the isolators into the plate.
20210401_183234_1.jpg
I ground all of the isolators short on the one side then welded them to the plate and ground them flush.
20210401_183244_1.jpg
Welded the plate up to the tank, capped the feed line then filled the tank with water to check for leaks.
20210401_192028_1.jpg
NO LEAKS!!
So I mocked up the tank cover and clearanced the cover for all of the filter/pump mounts.
20210403_161035_1.jpg
 

Attachments

  • 20210329_192029_1.jpg
    20210329_192029_1.jpg
    317.7 KB · Views: 101
  • 20210329_203156_1.jpg
    20210329_203156_1.jpg
    271.3 KB · Views: 106

96dreamer

Well-Known Member
Established Member
Joined
Feb 22, 2007
Messages
2,238
Location
St.Louis
I also added foam strips to the top of the tank in the stock arrangement to limit vibrations and harmonics.
20210403_161029_1.jpg
With the new tank and other components I also decided to whip up some new stainless tank straps. Made them from 10ga 316.
20210314_140018_1.jpg 20210314_153103_1.jpg
Clearance between the filters and diff cover.
20210403_214545_1.jpg
New straps looking fresh
20210403_214601_1.jpg
View from the driver side and from lower under passenger side
20210403_214612_1.jpg 20210403_214729_1.jpg
Pretty happy with how everything turned out. It sits up higher than the tank to avoid any road debris, plenty of clearance to the diff and should provide enough room to service filters as needed.
 
Last edited:

96dreamer

Well-Known Member
Established Member
Joined
Feb 22, 2007
Messages
2,238
Location
St.Louis
Now you need to drive it for awhile. Great work and update.
What fun is that lol. The big push to finish the fuel system is were expecting our first kiddo in July so I wanted to get it up and going before then. I've put a decent amount of miles on it since buttoning up the fuel system. I can take it to 7k on the wastegate now and not have fuel issues. But the 80lbers with e85 and a base pressure of 43 are becoming a restriction. It's been an absolute blast to drive though. Power delivery is smooth and linear, the noises it makes make me smile every time I drive it and learning to tune in its been a blast.

Edit: Realized I forgot to add photos showing the final fuel line placement. It fits in the timeline of things ok here.

Line coming out of the post filter. I wrapped this in high temp fuel sleeve but did grab pictures. You can also see the return line running up on top of the tank. I also ran a e85 compatible hose from the return on top of the tank into the fuel basket inside the tank in order to help prevent starvation.
20210408_161535.jpg

Supply and return running up over the axle
20210408_161519.jpg

Down near where the muffler sits. Both supply and return got heat sleeving here as well but I again forgot pictures.
20210408_161508.jpg

Cuts above the sub frame connector then runs down the hammers pinch weld.
20210408_161458.jpg

Runs up the pinch seam to the motion raceworks inline ethanol sensor housing. I wasn't to thrilled with the sensor being under the car right behind the tire so I used some kidex to make a cover for it that I think turned out pretty good.

20210408_161446.jpg

20210406_192844.jpg

It zipties to the housing and tucks up very nicely.
20210406_192822.jpg

Then up to the regulator like before. Return follows the supply back to the tank.
20210408_161421.jpg
 
Last edited:

96dreamer

Well-Known Member
Established Member
Joined
Feb 22, 2007
Messages
2,238
Location
St.Louis
I was still having issues with a lean spot in the lower part of the fuel map and issue with power falling off above ~6500rpm. Duty cycle of the 80lb injectors was up around 95% at 6500 rpm so I bought a set of Bosch 210lb injectors and height adapters and clips along with a set of adapters to go from ev6 to denso adapters. I liked this particular set of height adapters because they incorporated an inlet filter into them. Many of the cheaper ones don't. the hat is crooked in the picture because I was seeing how much the hat could tilt on the injector
20210714_141952.jpg

For whatever reason the injectors were about 1/8" taller than the sd 80s so I had to oval out the hole on the fuel rail slightly.

20210718_160657.jpg

At the same time I also added a radium engineering fuel pulse damper to the driver fuel rail. I am thinking that the random lean spots that I was unable to tune out were due to some fuel system harmonics with the new big injectors. I screwed it directly into the fuel rail adapter and 90'd right off of it.
20210901_191752.jpg


Lastly when I originally installed the ls2 d585 coils I made up stainless leads to the plug for the coil on plug setup. They worked nice and firmly clicked the coil to the injector. I problem with this setup however was that water would get into the plug holes and started corroding the plug end of the lead. There were also broken strands on the braded cable on every lead that wasn't originally there. I am not sure the ferrite donuts I put on were accomplishing anything at all either.
20210830_195924.jpg

To replace this I ordered a factory replacement set of Denso cop springs and boots. I crimped 8 new spark plug wire ends for the coils just large enough that I had to "thread" the spring onto the crimped end. Bonus of these denso springs is the have a sizeable ferrite core in the center to hopefully help cut down on any noise.
20210831_211039.jpg


20210831_211114.jpg


Approximate difference in length to a stock coil. The fit on the plugs perfect.
20210830_200347.jpg

Still haven't been able to drive it with the fuel pressure damper or new coil setup however, hoping to be able to this weekend. New baby plus work and trying to still get to the gym really cuts into project time.
 
Last edited:

96dreamer

Well-Known Member
Established Member
Joined
Feb 22, 2007
Messages
2,238
Location
St.Louis
Are all the old picture links not showing up for everyone else also? They come up if I click them but aren't viewable when scrolling. @SID297 is this a temporary thing with the new servers?
 

96dreamer

Well-Known Member
Established Member
Joined
Feb 22, 2007
Messages
2,238
Location
St.Louis
Well i was finally able to drive the car and the lean spot appeared to be gone and the car drove and idled much smoother so I thought the problem was cured. However after reviewing the logs the passenger side is still experiencing the same lean spot, although significantly improved, and the AFR fluctuates quite a bit more than the driver side that has the damper. My theory is the distance from the damper to the passenger rail is not allowing it to sufficiently dampen the pulses in that bank.
For reference this is what the fuel system looks like now.
Font Parallel Rectangle Slope Electric blue


In order to remedy this I could install a second damper on the driver rail like below. I am sure this is the most effective but I am not sure it is needed and it is the most costly option.

Font Parallel Circle Symbol Electric blue

Another option is to run -10 from the regulator to a tee on the passenger rail and try to install the regulator between the two rails and hope the one is sufficient to dampen both rails. I also had a member of another forum claim running a tee off the rail contributed to his engine failure due to improper fuel supply. From what I remember from my fluids classes this seems highly unlikely however the thought is still in the back of my head as a concern.

Parallel Font Rectangle Electric blue Symmetry

If anyone has experience running aftermarket dampers what are your opinions on the single fpd between the rails vs one mounted directly to each rail?
I am sure someone will also mention that the deadhead layout is not optimal and that the regulator should be mounted after the rails. I am aware of that and I am trying to avoid that purely for aesthetics. There's also no guarantee that the large injectors and pump wouldn't still have the same harmonic and cause the same issue putting me in the same situation.

I'm currently waiting on a few fittings to come in to see what kind of placement would be possible with the fpd between the rail or if it is even possible.
 

96dreamer

Well-Known Member
Established Member
Joined
Feb 22, 2007
Messages
2,238
Location
St.Louis
Went out to get some groceries and cam home on a trailer. Car lost all spark for some reason at the end of a pull and stranded me on the side of the road. Log looked ok no idea why it shut off. Pulled the plugs when I got home just to ease my mind and they all looked ok. Hoping to have some time this weekend to further diag.
 

SecondhandSnake

Well-Known Member
Established Member
Joined
Jan 29, 2011
Messages
1,759
Location
Columbus, IN
Looks like you went through a lot of the stuff I did last summer. Although I ended up machining 1-2mm off the spacers for the injectors rather than ovaling the rail holes.

I haven't had any issues with fuel pressure- running a similar setup with -10 supply, -8 return, Fuelab pump and regulator, deadhead setup with no crossover. That said, have you considered running the damper before both of the rails, similar to how the factory setup was? If it's got enough capacity and you have enough room, that could solve your problem with minimal work and cost.

I might also have to switch my pump setup to the front of the tank like yours. I've got a sump tank with the pump and filters mounted behind it to cut down on supply restriction, and make pump/filter access easy, but it's really visible and can cause some clearance issues on steep inclines.

And how loud is your pump? I'm just running some mount isolators but mine is awfully noisy.
 

96dreamer

Well-Known Member
Established Member
Joined
Feb 22, 2007
Messages
2,238
Location
St.Louis
I was able to look at it for a few minutes on lunch and it looks like I have an open ground to the block from the coil connector. Odd it would happen out of no where after a pull but at least I have a culprit to look into. Going to have to pull the intake to get to the wiring. Pretty much have that down to a science at this point.

Looks like you went through a lot of the stuff I did last summer. Although I ended up machining 1-2mm off the spacers for the injectors rather than ovaling the rail holes.

I haven't had any issues with fuel pressure- running a similar setup with -10 supply, -8 return, Fuelab pump and regulator, deadhead setup with no crossover. That said, have you considered running the damper before both of the rails, similar to how the factory setup was? If it's got enough capacity and you have enough room, that could solve your problem with minimal work and cost.

I might also have to switch my pump setup to the front of the tank like yours. I've got a sump tank with the pump and filters mounted behind it to cut down on supply restriction, and make pump/filter access easy, but it's really visible and can cause some clearance issues on steep inclines.

And how loud is your pump? I'm just running some mount isolators but mine is awfully noisy.
Honestly machining the spacers down didn't even cross my mind, I even have a lathe in the garage. I didn't see any downside to ovaling the holes and it was pretty quick.

I did think about running the damper just after the regulator before the Y but the housing only has -8 orb fittings and I did not want to create a restriction before the rails. I didn't come across a readily available options for mounting the damper in the -10 line without having to potentially introduce a restriction and I didn't want to go full custom on something I wasn't even sure would solve the issue.

My pump is not very loud but I am using the pwm output of the MS3 and running it at like 25% at idle. With the windows up and car running you can't hear the pump over the exhaust and blower noise. When I was testing right after install and running it at 100% it was significantly louder.
 

96dreamer

Well-Known Member
Established Member
Joined
Feb 22, 2007
Messages
2,238
Location
St.Louis
Car is back up and running. Grounding point for the coil circuit somehow came loose. Odd it never gave me any other issues and happened as soon as I finished a pull to redline in 3rd gear. Cleaned both surfaces and reinstalled with some blue loctite.

Also going to move forward with installed a second damper on the passenger rail. I tried laying out the system with a tee on the passenger side rail and there just isn't enough room to do that with the damper in between the rails.
 

Attachments

  • 20210911_170243.jpg
    20210911_170243.jpg
    282 KB · Views: 92

96dreamer

Well-Known Member
Established Member
Joined
Feb 22, 2007
Messages
2,238
Location
St.Louis
PSA don't winch your car up by your inner tie rod‍:mad:
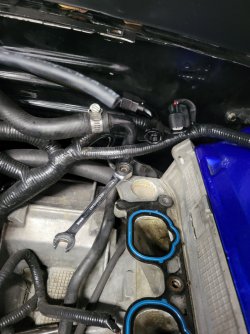
. Was in a rush and could have swore it was around the control arm
20210913_195117.jpg
 
Last edited:

96dreamer

Well-Known Member
Established Member
Joined
Feb 22, 2007
Messages
2,238
Location
St.Louis
On with the updates!

Way back in December I won a $500 gift card to lethal which I used to get a set of ARH headers and mid pipe. They sat around for quite a while waiting for it to warm up so I could cerakote them.


20220410_141826.jpg


20220410_155919.jpg

20220410_155928.jpg


While I had the k member out I pulled the oil pan to fix a leak and pulled the timing cover to upgrade my tenioner arms and modify my primary tensioners.

20220416_142125.jpg

20220416_173330.jpg
20220416_173335.jpg

20220416_150942.jpg


Also swapped thy hydroboost out with a low mileage one I got a while back off of here since mine was leaking. Unfortunately I didn't look it over well enough back when I bought it and found the rod had cracked behind the boot inside the car.

20220415_151703.jpg


I wedge some brass shim stock behind the gap, threw some tacks over the gap and filed down the extra material. The pushrod couldn't pull out of the crimp even with the piece missing so bridging the gap with weld should work just fine. This is never really being pulled anyway.

20220415_155522.jpg
 

96dreamer

Well-Known Member
Established Member
Joined
Feb 22, 2007
Messages
2,238
Location
St.Louis
Unfortunately I ran into a road block today. I hadn't bothered fitting up the mid pipe because I didn't think there would be any issues there. Wen to throw it on today to button up the car and found the collector aims straight into the trans cross member.
20220506_135001.jpg


20220506_135033.jpg


I measured the distance across the collectors and the x pipe and the min and max width it would be to make sure the long tubes weren't off. I knew they were listed as fits 99-04 but figured that was for the egr connection and hadn't thought about the cross member. Guess I found out the hard way.
20220506_134822.jpg

20220506_134731.jpg

20220506_134851.jpg

Looking into options on this right now. Feel like a dumb ass for not thinking of this before hand but it is what it is I'll get it figured out.
 
Last edited:

98 Saleen Cobra

Well-Known Member
Established Member
Joined
Feb 28, 2007
Messages
19,523
I had this same issue with my Kooks midpipe on my car. I had to have a exhaust shop get creating hacking and cutting up my xpipe setup to fit.
 

Users who are viewing this thread


Top