By chance does anyone know the safest way to remove clear coat for a tail light lense. I’m assuming it was sprayed on there to keep the finish like new or to make it easier to maintain but the clear coat is flaking. No pics at the moment but will post up once I receive the lights thanks.
You are using an out of date browser. It may not display this or other websites correctly.
You should upgrade or use an alternative browser.
You should upgrade or use an alternative browser.
Clear coat removal
- Thread starter esonu
- Start date
The lights were likely cleared to cover UV damage. The plastic does not allow paint to adhere well, and peeling will occur over time.
The best thing to do is purchase a new set of headlights.
I know that isn't an option that is within everyone's budget. The next option would be to sand and remove the old clear, and then wet sand, stepping up to at least 2000 grit paper. After this you can buff and polish the original plastic back to a new appearance.
It's a lot of work, but I have had to do it myself.
Sent from my [device_name] using the svtperformance.com mobile app
If it's already flaking you MAY be able to remove it with mineral spirits, but I don't know that I would go that route since it might also damage the plastic on your lens.
Like Revv wrote, sanding is probably your best option. For something like a tail light I'd probably go with a sanding block as opposed to paper. The block is more flexible and easier to use around odd angles/small spaces.
You can pick them up at pretty much any auto parts store, they look like sponges sort of.
I'd probably start with something like 300 or so and then maybe go to 1000 and then buff, you could go to 2000, but you might find you can get a nice result out of just buffing from 1000 just depends... use your judgement")
Like Revv wrote, sanding is probably your best option. For something like a tail light I'd probably go with a sanding block as opposed to paper. The block is more flexible and easier to use around odd angles/small spaces.
You can pick them up at pretty much any auto parts store, they look like sponges sort of.
I'd probably start with something like 300 or so and then maybe go to 1000 and then buff, you could go to 2000, but you might find you can get a nice result out of just buffing from 1000 just depends... use your judgement
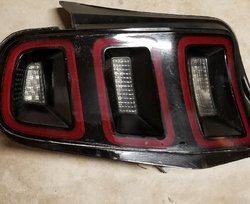
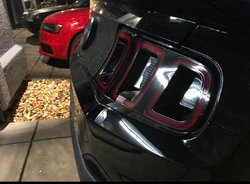
Wasn’t too bad thought it would be worse. Started off cracked and messed up but both taillights look the same now. Sanded with 1000,1500,2500 then used some m205 and m105 and ended with some jet seal I think looks just like new lol.
Attachments
Nice work! They were hammered. Came out great!
Thanks took like two hours lol.
Nice work! They were hammered. Came out great!
Users who are viewing this thread
Total: 2 (members: 0, guests: 2)

