97' Cobra IRS Swap Project Thread

Top Fuel Friday

Dang!
Established Member
Joined
May 3, 2004
Messages
321
Location
Independence, KY
Hi everyone,
I recently picked up a low mile 97 Cobra, while I love the car I don't feel it handles or rides as nice as my 01' cobra did. To remedy this I decided to swap in an IRS rear and upgrade the front suspension so it the car has a killer look with a more modern touch than it left the factory 17 years ago.

The main purpose of this thread is for motivation for me to complete the project, and provide documentation and pictures (hosted forever on imgur) in case someone in the future needs a road map to do the same kind of swap.

What we started with:
I moved to Florida from California in August after selling my 01 cobra in April. I was in the market for another mustang and found this low mileage car on Craigslist and made the move to pick it up.

http://i.imgur.com/WPS0wTY.jpg
WPS0wTY.jpg


The IRS:
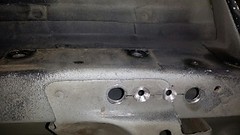
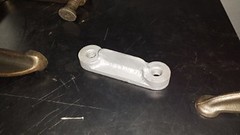
I knew I wanted an IRS about 2 months after owning the car. I started looking on the forums and local craigslist and found an 01 cobra being parted out in Orlando. I was able to pick up the complete IRS with 95% of the parts for a pretty good deal. While I was looking for the rear end I came across an 03 cobra front diff brace (Has 2 added mounting bolts to further brace the IRS differential) and some maximum motorsports front and rear IRS bushings.

I went ahead and cleaned all the 03 cobra parts and re-painted them with VHT roll cage and frame paint. It leaves a great finish and should protect the parts from the elements.

http://i.imgur.com/NSWELWO.jpg
NSWELWO.jpg
 
Last edited:

Top Fuel Friday

Dang!
Established Member
Joined
May 3, 2004
Messages
321
Location
Independence, KY
Day 1 the IRS upper mounts

The upper mounts on the IRS mount into a bracket that takes the place of the quad shock mount on non-irs cars. In the 99+ cars have 2 extra welded in bolts in the frame for 4 total bolts on this bracket (2 side bolts, 2 bottom bolts). On the 94-98 cars the 2 bottom bolts aren't in the frame.

From my research I found a few ways to get around this,
  • Drill up through the frame and bolt through the floor of the trunk (you run the risk here of crushing the subframe if you bolt it too tight apparently)
  • Cut the side of the subframe, weld in 2 bolts, and then weld a patch panel back over
  • Use the 2 side bolts an weld around the bottom of the bracket to attach to the frame


I opted to go with option 3. The car is going tomorrow to a shop in Lakeland, FL to have a pair of maximum motorsports XL subframe connectors welded in. Since there was going to be weld work already I took the first step which is swapping out the quad shock mount for the IRS Bracket.

To do this you will jack up the car and place on jack stands. Then remove the rear wheel.

You'll see this (Drivers Side, do this one first it's way easier) :
http://i.imgur.com/RAMJ9dv.jpg
RAMJ9dv.jpg

The quad shock is the horizontal shock held on with 2 15mm bolts (1 on the axle and 1 on the bracket)

First you will remove the bolt where the quad shock attaches to the axle housing, you'll need to finagle your socket wrench in as the bolt backs out towards the middle of the car. The nut is welded onto the axle so you don't have to worry about having a 2nd wrench or socket to take the bolt out.


You can see the bolt here facing the right side of the picture. I hit it with some liquid wrench lubricant so that it's easier to remove.
http://i.imgur.com/XZnBScT.jpg
XZnBScT.jpg

After getting this bolt out it's time to tackle the quadshock bracket:
http://i.imgur.com/R5jJI1w.jpg
R5jJI1w.jpg


You only have to remove the 2 outer 15mm bolts to get the bracket off the car, pretty easy and it looks like this when it's off:
http://i.imgur.com/VK9CbPL.jpg
VK9CbPL.jpg

The next step is to bend the 2 metal tabs that are facing down up and out of the way. I found the easiest way was with a plumbers wrench.

You can see the tabs here, and the next picture is me bending them up. I used the wrench to keep the tabs straight and push them up flush with the car body to be out of the way.

http://i.imgur.com/5vowSa8.jpg
5vowSa8.jpg

http://i.imgur.com/ABXelw9.jpg
ABXelw9.jpg
 
Last edited:

Top Fuel Friday

Dang!
Established Member
Joined
May 3, 2004
Messages
321
Location
Independence, KY
After these tabs are bent out of the way you can hold up the IRS bracket and bolt it into place using the 2 bolts that were holding the quad shock bracket in place. This is pretty straight forward, but you do need to have the bracket lined up so the bolts go in easy. When bolted in it looks like this:

http://i.imgur.com/9KpYbbj.jpg
9KpYbbj.jpg


http://i.imgur.com/KlaivhO.jpg
KlaivhO.jpg


You can see here on the bottom where the bolts for the 99+ cars go through, this is where my shop will need to put a weld around the bracket

http://i.imgur.com/SMhtO6L.jpg
SMhtO6L.jpg

Now put the wheel back on and check for clearance around the wheel and the bracket. If everything is fine you're good to repeat on the other side.

The passenger side is a complete repeat of the drivers side with one exception. You will find there are some fuel hard lines that route through where the IRS bracket needs to go. You'll need to drill out a small rivet and gently persuade the hard lines down a little bit so that the bracket can slide in place. Isn't a big deal but you don't want to go too fast and damage one of the fuel lines.

I don't have photos currently of the mount on this side, but I will once I get the car on stands to remove the rear end.


This is where I left it tonight, it's completely safe to drive without the quad shocks. I put the wheels back on and torqued them down to 100 ft/lbs.

Next step is to disassemble the IRS. I'm going to have the center section rebuilt so I know I'm putting in a good rear since I only know miles and not the history of the rear.
 

Attachments

  • KlaivhO.jpg
    KlaivhO.jpg
    315.8 KB · Views: 792
Last edited:

Tabres

Not without incident
Established Member
Joined
Jan 31, 2003
Messages
9,818
Location
Bloomington, Il
Great work! Keep going with the walk-through, please. This is quality tech that we don't get here often anymore. Should be a sticky after you're done!
 

arayray

Member
Established Member
Joined
Sep 19, 2012
Messages
877
Location
Pittsburgh, Pa
Nice build, I just completed this swap in my car. If you have any questions, there are alot of people on here that can help!
 

cobralvr01

Active Member
Established Member
Joined
Jul 17, 2014
Messages
400
Location
phoenix
Subscribed, I plan on doing this down the road when I have the time and funds for the swap. Great job on making it as detailed as possible with ALOT of pictures. Keep it up.
 

Top Fuel Friday

Dang!
Established Member
Joined
May 3, 2004
Messages
321
Location
Independence, KY
Thanks everyone, I do process documenting at work so hopefully some of that will spill over here lol.

Just an update, yesterday I had the subframes welded into the car (Great mod btw, if you don't have them get them asap esp for a vert). My plan was to have the upper mounts welded in as well, but to do it right is going to take dropping the exhaust and gas tank to get a good weld in. So right now they are just bolted in, once I get the IRS in I'll take it back to get the brackets welded.

I'll start the IRS assembly in the next week, we have some company in town so I don't have a lot of free time at night at the moment. When I disassemble I'll get everything washed and re-painted if needed and start replacing bushings and take the center section to the local ford place to have it rebuilt and 4.10's put in.
 

cobralvr01

Active Member
Established Member
Joined
Jul 17, 2014
Messages
400
Location
phoenix
How much are you being charged for the shop to weld them in? Also, you probably already mentioned this, but are you going with any other bushings? If so what kind?
 

Top Fuel Friday

Dang!
Established Member
Joined
May 3, 2004
Messages
321
Location
Independence, KY
Don't know yet really for the IRS (The subframes were 300 bucks). I would have been cheaper to get them done with the subframes, but i needed the vehicle back and they didn't have time to drop the tank and weld those in. So when I take it back they'll have to drop the tank ($$$), remove the cat back ($$$), and there's a bracket I'm going to get a photo of that will probably need to be removed so you can weld the the subframe instead of this flimsy thing.

I'm going to go ahead and install the IRS and then take the brackets to be welded. I saw a few folks had went this route and didn't have any issues with short term driving. I'll take the pipes off post muffler (Going to get a SLP catback) so I don't eat that cost, and they can drop the IRS out with taking the 4 driveshaft and 4 subframe bolts out to really get in there and get a good weld on the subframe.


I've decided to go with maximum motor sports for the center section bushings, I may go with them again for the subframe bushings or FTBR, depending what's a better price point. For normal driving I don't think there will be that much of a difference. MM does sell a 12mm version of the lower subframe bushings to match the factory bolt holes on the 94-98 cars (99+ have a 14mm bolt) so you don't have to drill out the subframe to slide the bolt in. That seems like the route I'm going to take.
 
Last edited:

Dizrah

Dizrah
Joined
Mar 14, 2016
Messages
3
Location
Cascadia
My 2 Cents...

I fabricated some nut plates to install an IRS in my 95 Cobra.

Drill the holes...

25796589505_17f9a35f66_m.jpg


Extract body nuts from donor mustang frame rails. Remove frame rail sections with the nuts installed.


25771260196_442e0ecda0_m.jpg


Fish the nut plates into the proper location inside of the frame rails. Look at he bottom left in the pic. The nut plate is beginning the journey up the inside of the frame rail. Upper right corner you can see the green pull wire sticking out of one of the drilled holes.

25797715255_bd7345c2da_m.jpg


So, you can install the IRS with out welding, and have it look like a factory install. It is at least a strong as a bolted in install. I elected to weld my nut plates in place. You might have noticed the beveled holes in the top picture. I utilized those holes to plug weld the plates to the inside of the frame rails. You probably also noticed that the nut plates were beefed up.

Ok, I confess. I have a TIG welder so I used it.

The nut plates are extracted frame rail sections from a donor mustang. They already have the nuts welded in place. No measuring required. I just shaped the rail sections with a metal belt sander and a rotary tool. I extracted the frame rail section with a battery reciprocating saw at the junk yard. I added some extra steel, probably did not need to.
 
Last edited:

Users who are viewing this thread


Top