Long time since I posted, thought I would contribute a projector headlight retrofit after action report. This has been done before with “How To’s” so I will contribute my lessons learned for those not satisfied with retro prices as they stand or after market solutions.
I ran HID in stock housing, as well as the latest Morimto 9007 LED Bi-Xenon kit. All results were underwhelming but refused to pay a retrofit price. What I found was this:
Retrofit can be done with minimal work and cost - assuming you use a quality factory replica headlight and Mini H-1 projectors. My build was as follows:
- Eagle Eye factory replacements off eBay ($84) - only light that had good reviews and bi-directional adjustment (a must, I had to adjust mine horizontally quite a bit). Super easy to pull apart after 20 min @ 240 degrees.
- Morimoto Stage III MH-1 projector retrofit kit ($230) off eBay seller LightWerks - kit included Morimoto MH-1 7.0 projectors, shrouds, sealant, Bi-Xenon relay harness/9007, HID ballast, igniters, bulbs. If you have HID’s already, you only need the projectors and shrouds at $100 full kit.
- Morimoto Moto H-1 holders. Stock projectors use a metal paper clip lock thing that looks terrible, I used a plastic locking O-ring setup ($20) - eliminates bulb cant.
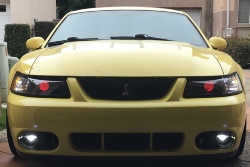
- Diode Dynamics Demon eyes with blue tooth controller ($120). I had the work already done, figured I would regret not putting these in for DLR’s. Came with H-1 brackets, full driver harnesses and BT controller.
Lessons:
- The few YouTube videos out there for mustang retrofits are horrible - they provided little value. TRS instructions on baking, resealing, mounting MH-1 gets the job done.
- Stock reflector housing MUST be ground down with a Dremel so the entire reflector bowl back is round. You cannot lob half the 9007 lock ring off, the full ring must be removed. No effort, easy process. NO other cutting required for the housing using MH-1.
- CLEAN HANDS! The stock lights will scratch if you look at them. Take them apart wearing latex gloves, NEVER bare hand them, once they are dirty they must be washed and blown off, no wiping with towels or they will scratch. This include projector lenses as well.
- HI beam harness. Once you plug this into the projector for test fitting, DO NOT REMOVE IT! The harness fits tighter than the actual bracket construction. Removing the harness could cause the entire projector solenoid bracket to crack. Leave it in place.
- Projector shroud can easily be cut with a miter saw for a perfectly level cut.
- Dremel bit width is perfect for routing hi beam harness wires or demon eyes and if routed down no lower than where the prior 9007 bracket used to be, will be sealed by the MH-1 O-ring that sits inside the bowl.
- Resealing. I could NOT get clamps to fit on the headlight face without scratching so after I pressed the light together, I placed spring clamps on the corners (a must) and used my hands to hold the front and rear of the light in place for about 5 minutes until room temp achieved.
Long post but wanted to provide lessons I did not extrapolate from searching on here or other forums.
The Morimoto MH-1 7.0 is held in high regards which I did not find the case - my lighting is very good, but a D2S or FX type projector will give you European HID factory results. The MH-1 is great and I chose it due to size and implications for the time/work required for retrofit, just know you will not have a X5/A6 type headlight afterwards.
Project took about an hour a night for a few nights, super easy, relatively low cost if you don’t go with the demon eyes, highly encourage anyone with basic DC skills and attention to detail to go for it.


I ran HID in stock housing, as well as the latest Morimto 9007 LED Bi-Xenon kit. All results were underwhelming but refused to pay a retrofit price. What I found was this:
Retrofit can be done with minimal work and cost - assuming you use a quality factory replica headlight and Mini H-1 projectors. My build was as follows:
- Eagle Eye factory replacements off eBay ($84) - only light that had good reviews and bi-directional adjustment (a must, I had to adjust mine horizontally quite a bit). Super easy to pull apart after 20 min @ 240 degrees.
- Morimoto Stage III MH-1 projector retrofit kit ($230) off eBay seller LightWerks - kit included Morimoto MH-1 7.0 projectors, shrouds, sealant, Bi-Xenon relay harness/9007, HID ballast, igniters, bulbs. If you have HID’s already, you only need the projectors and shrouds at $100 full kit.
- Morimoto Moto H-1 holders. Stock projectors use a metal paper clip lock thing that looks terrible, I used a plastic locking O-ring setup ($20) - eliminates bulb cant.
- Diode Dynamics Demon eyes with blue tooth controller ($120). I had the work already done, figured I would regret not putting these in for DLR’s. Came with H-1 brackets, full driver harnesses and BT controller.
Lessons:
- The few YouTube videos out there for mustang retrofits are horrible - they provided little value. TRS instructions on baking, resealing, mounting MH-1 gets the job done.
- Stock reflector housing MUST be ground down with a Dremel so the entire reflector bowl back is round. You cannot lob half the 9007 lock ring off, the full ring must be removed. No effort, easy process. NO other cutting required for the housing using MH-1.
- CLEAN HANDS! The stock lights will scratch if you look at them. Take them apart wearing latex gloves, NEVER bare hand them, once they are dirty they must be washed and blown off, no wiping with towels or they will scratch. This include projector lenses as well.
- HI beam harness. Once you plug this into the projector for test fitting, DO NOT REMOVE IT! The harness fits tighter than the actual bracket construction. Removing the harness could cause the entire projector solenoid bracket to crack. Leave it in place.
- Projector shroud can easily be cut with a miter saw for a perfectly level cut.
- Dremel bit width is perfect for routing hi beam harness wires or demon eyes and if routed down no lower than where the prior 9007 bracket used to be, will be sealed by the MH-1 O-ring that sits inside the bowl.
- Resealing. I could NOT get clamps to fit on the headlight face without scratching so after I pressed the light together, I placed spring clamps on the corners (a must) and used my hands to hold the front and rear of the light in place for about 5 minutes until room temp achieved.
Long post but wanted to provide lessons I did not extrapolate from searching on here or other forums.
The Morimoto MH-1 7.0 is held in high regards which I did not find the case - my lighting is very good, but a D2S or FX type projector will give you European HID factory results. The MH-1 is great and I chose it due to size and implications for the time/work required for retrofit, just know you will not have a X5/A6 type headlight afterwards.
Project took about an hour a night for a few nights, super easy, relatively low cost if you don’t go with the demon eyes, highly encourage anyone with basic DC skills and attention to detail to go for it.
Attachments
Last edited:
")

