FTBR brake install (front and rear)

Nsssane1

Member
Established Member
Joined
Jun 17, 2012
Messages
542
Location
North Ms
Damn Tob, you have enough projects going on?!!!!

Very nice, do u race the car that you went with the linger ARP studs and open ended lugs?


I think he likes working on the car more than driving it, I know the feeling I really enjoy adding parts to the car, myself. And I do have more time adding parts than driving it. alot more!!!

Nice work!!!
 

Tob

Salut!
Super Moderator
Joined
Mar 17, 2009
Messages
12,251
Location
The Ville
I think he likes working on the car more than driving it, I know the feeling...
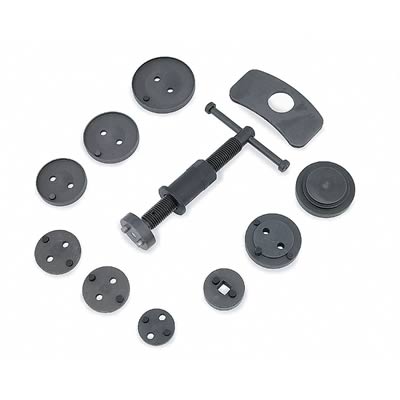
You picked up on that eh? Well you're right. Wrenching on fine machinery has always put a smile on my face.:-D

I took quite a few photos for this mod and I think they may provide some worthwhile insight to anyone on the fence. This one is easy when you eliminate the unknown. Let's see if I can win over at least one individual that may want to dive into the brakes but doesn't have much practical experience with S197 brakes (or any brakes for that matter).

Here's an exploded service view and list that identifies the individual parts that comprise the rear brakes on our beloved S197's...

_rearbrakeexplodedview_zpscb624cca.jpg

_rearbrakepartslist_zpsc56b6ad8.jpg

rearbrakepartslist1_zpsae577d9e.jpg


Once you remove the wheel/tire assembly you can access the two caliper bolts (#6). I removed them and set the caliper on a ramp so that they wouldn't be hanging. Makes them easy to work on as well.

In order to remove the brake caliper anchor plate (#7), you have to remove the two brake caliper guide pin bolts (#1). You can see one at my thumb and the other at my index finger (13mm wrench).

IMG_0810_zps5c134fd5.jpg


IMG_0817_zps4f7065bf.jpg


IMG_0812_zpsea8af25f.jpg


IMG_0815_zps20d4d7e7.jpg


Flipped over, this is what you'd see...

IMG_0818_zps766ce0f7.jpg


The pads just about fall out at this point...

IMG_0820_zps1a6fd6ee.jpg


The two spring clips (#4) lift right out of place...

IMG_0821_zpseb4ce15c.jpg


This is what you are left with...

IMG_0822_zps2e46744e.jpg


You are now ready to rework the 'cage' to fit the adapter plates in Bruce's kit. You'll need a 5/16" allen socket, torque wrench, vice, a small amount of blue loctite, grinder/file/belt sander/mill (or whatever else you have to get the job done) to knock the 'humps' down a bit.

IMG_0828_zps0bae5c86.jpg


Here's the caliper piston that needs to be pushed back into its respective bore in order to allow installation of the new rotors (note the slots in the piston that run vertically)...

IMG_0823_zpsdab62b0b.jpg


I successfully used a spanner wrench for a 4" grinder but Ford shows this tool in their service manual...

_RearBrakeCaliperPistonAdjuster_zps994fb2d8.jpg


I took a baseline measurement to see how much of a gap I had...

IMG_0837_zps7ae9c663.jpg


Again, I used the wrench I had in order to turn the piston clockwise (along with some inward pressure) until I had the needed room...

IMG_0833_zps61d3b6b9.jpg


You need to finish with the slot in a vertical position so that the pad locating pin can be engaged...

IMG_0832_zps3e9db199.jpg


Everything goes right back together (with Bruce's adapter now along for the ride)...

IMG_0840_zpsf8b8d065.jpg


Spring clips and pads slip right back into place...

IMG_0846_zps1aeb2f2f.jpg


Slip the new rotor into place and bolt the entire caliper assembly into place (etc) and you're done!

IMG_0860_zps4d815850.jpg


For contrast, I slipped both old and new rotors into place at the same time...

IMG_0850_zps7f0139af.jpg


IMG_0851_zps52b72c8c.jpg


IMG_0856_zpsb8f5b772.jpg


Anyway, both rears are done.

IMG_0862_zps8cf8a716.jpg


Fronts are even easier!
 

Tob

Salut!
Super Moderator
Joined
Mar 17, 2009
Messages
12,251
Location
The Ville
Nah, I try to make due with what I have. That isn't to say I'm not considering picking one up...
 

03 DSG Snake

Unknown Cyborg
Established Member
Joined
Nov 3, 2002
Messages
21,049
Location
CA
Nah, I try to make due with what I have. That isn't to say I'm not considering picking one up...

I was originally using the CUBE type tool for the rear calipers after a failed attempt with needle nose pliers:

A-CALIPER%20TOOL%20-%20366x399.jpg


That thing was the biggest POS tool I ever purchased and came close to hurling it out into the street many times.

Picked up that tool kit from HF and it makes the job a breeze. Plenty of places have them.
 

6-Speed

Member
Established Member
Joined
Oct 16, 2007
Messages
982
Location
Arizona
Just curious whether the adapter could be manufactured to fit the caliper bracket without grinding some of it away.
 

Tob

Salut!
Super Moderator
Joined
Mar 17, 2009
Messages
12,251
Location
The Ville
Ivan, referring back to this shot...

IMG_0756_zps3cf98baa.jpg


...I suppose if were to substitute the factory caliper bolts for exact length bolts, you could probably get by. Except they'd need to be a hair short and factoring in the bolt taper at the start of the threads, you'd be giving up some useable thread - probably not a good thing. A slightly larger diameter rotor ring would allow moving the adapter bracket bolt hole centerlines to be placed further apart as well. That would mean a slightly 'taller' adapter bracket. Problem with that (WAG here) is that you'd probably be looking at a non-standard ring $ize.

I had no qualms whatsoever in removing the minimum amount of material necessary for clearance in order to use this kit.

Ron, I have one of those cubes in a drawer somewhere. I haven't been able to find it since I put it there (where ever 'there' is). Here's a shot of the aforementioned tool in action (I made the caliper a sexy pink hue just to catch your eye).

S197rearcaliperpistontool_zpsa898b8d6.jpg
 

ac427cobra

FULLTILTBOOGIERACING.COM
Super Moderator
Joined
Oct 20, 2002
Messages
20,923
Location
In the race shop
Just curious whether the adapter could be manufactured to fit the caliper bracket without grinding some of it away.

Making the caliper relocation bracket to accomodate NO modification to the caliper mounting bracket would have required a larger diameter rotor and also offsetting the caliper further out from it's original position. My thoughts were I did not want to add that much leverage to the rear brakes for fear of needing to add a brake bias adjuster. I tested the existing kit and it steps up the rear braking capacity nicely without adding too much rear brake to the vehicle.

This kit requires sanding two points off of the caliper bracket a total of about 1/4". It's not that big of a deal, really. :-D

:thumbsup::coolman::beer:
 

cluscher

Member
Established Member
Joined
Oct 20, 2008
Messages
772
Location
WA
Making the caliper relocation bracket to accomodate NO modification to the caliper mounting bracket would have required a larger diameter rotor and also offsetting the caliper further out from it's original position. My thoughts were I did not want to add that much leverage to the rear brakes for fear of needing to add a brake bias adjuster. I tested the existing kit and it steps up the rear braking capacity nicely without adding too much rear brake to the vehicle.

This kit requires sanding two points off of the caliper bracket a total of about 1/4". It's not that big of a deal, really. :-D

:thumbsup::coolman::beer:

Thanks for this detail as well, particularly regarding no need for brake bias adjuster. All this clarity without a physics class :thumbsup:.
 
Last edited:

Tob

Salut!
Super Moderator
Joined
Mar 17, 2009
Messages
12,251
Location
The Ville
I finished up the front rotor installation this afternoon. Once the wheel/tire are removed you are two 15mm bolts away from this...

IMG_0888_zps354c0a3d.jpg


And while I plan to add the appropriate ducting at a later date, I elected to slip in a pair of Bruce's exquisite brake cooling ducts now. They weigh as much as a couple of sheets of paper, are extremely rigid, and the construction/materials are first rate. Everything lined up perfectly. A really simple addition...

IMG_0893_zps9998fd92.jpg


IMG_0896_zpseecf9460.jpg


IMG_0949_zpsa172dfc0.jpg


They are a perfect match for Bruce's beautiful rotors...

IMG_0914_zpsdd5a2191.jpg


IMG_0905_zps42dec9ca.jpg


IMG_0900_zpsb38701c5.jpg


IMG_0932_zpsf0cd2dd2.jpg


IMG_0930_zps127931e5.jpg


I'll be reusing my near new OE pads until the rotors are properly seasoned. Then I'll slip in the set of Ferodo's I got from Bruce...

IMG_0606_zps2198dd9a.jpg


Changing front pads is really simple too. Since so many have probably missed it, here's a link from the 'How To' section that illustrates how easy it is...
http://www.svtperformance.com/forums/how-279/392589-shelby-front-brake-pad-removal-replacement.html

This has been a very satisfying upgrade. Less unsprung weight and greater braking capability. The aggressive appearance of the two piece rotors is a welcomed bonus as well. Thanks to Bruce at Full Tilt Boogie Racing for offering such a great product line.

Tob

On deck...Recaro's...
 

Tob

Salut!
Super Moderator
Joined
Mar 17, 2009
Messages
12,251
Location
The Ville
I did purchase brake fluid from Bruce as well.

IMG_0603_zpsc002449b.jpg


IMG_0604_zpse52f092b.jpg


Lines have been on my mind for some time now. I'm contemplating the FRPP Boss brake lines. I honestly don't think I'll ever be thrashing this car enough to necessitate a braided line. And as for ducting, I plan on removing the fog lights and using that location instead of the lower grille.
 

dirtyo2000

DirtyO2000
Established Member
Joined
Jun 25, 2010
Messages
2,343
Location
with mom
Was thinking about getting a set of rotors for the car for auto season this year. Think this is the route I might have to take. Was looking at the slotted and dimpled one but guess I'll have to save up a few more quarters. This is the third write up I've seen with no welding, what gives Tob.
 

Users who are viewing this thread


Top