2003 Cobra - New restoration/project

muscleatsrice

Well-Known Member
Established Member
Joined
Dec 23, 2020
Messages
456
Location
Bay area
Starting the paint correction since I got the M4 back. A little preemptive BUT I've wanted to do this SO badly since getting the thing. It's going to polish up really nicely though. I'll end up doing the oil cooler when I finish up the correction.

51873610492_d41d940701_b.jpg

51873610497_aa39699120_b.jpg


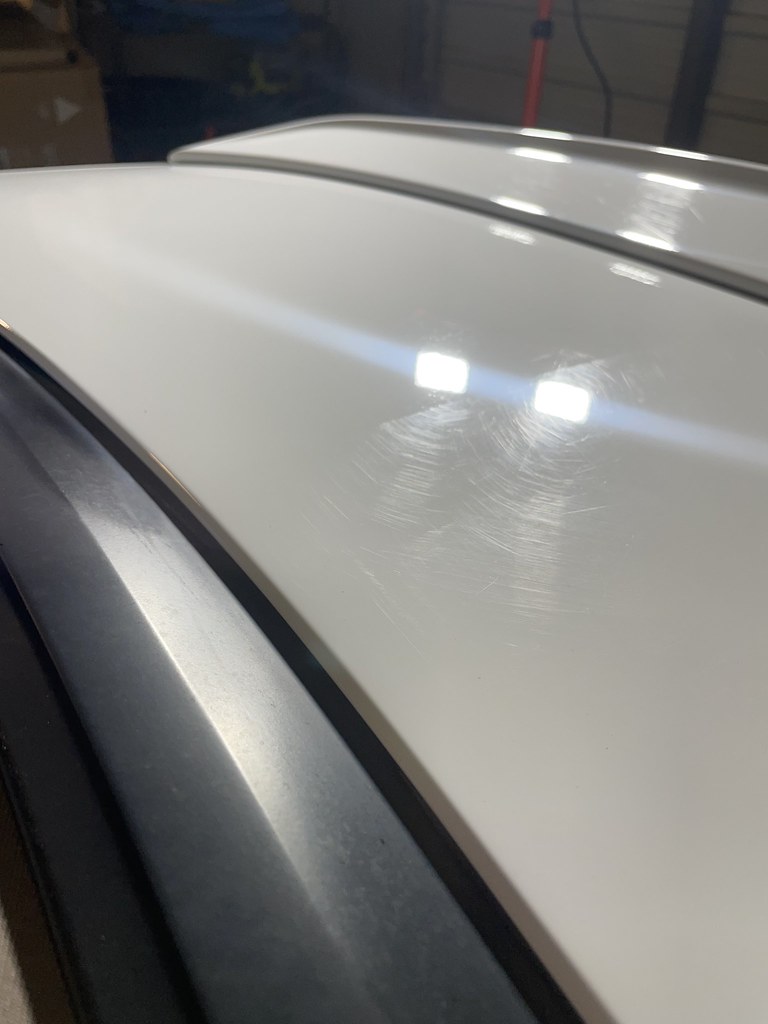
This is after a pass of a heavy cutting compound and then jumping to a finishing compound without any waxing. The rear bumper is BAD haha.

Looking good!

Any pointers on paint correcting? I’m teaching myself how to do this, and using my truck as the test subject I’ve a got a the chemical guys da polisher along with a few different cutting/polishing pads. For compound I’ve just got mothers ultimate compound.


Sent from my iPhone using the svtperformance.com mobile app
 

04DeadShort

SVT Addict
Established Member
Joined
Mar 20, 2008
Messages
1,494
Location
Carrollton, GA
Wonder if it has a upgraded 26 spline input shaft? Mine developed a noise just like that on cold start after I did the 26 spline shaft/clutch install in my 03. Pulled the tranny back out and added a extra .001" shim (.031 to .032) on the input shaft bearing and the noise went away. Just a thought.
 

TerminatoRS

Well-Known Member
Established Member
Premium Member
Party Liquor Posse
Joined
Jul 29, 2019
Messages
2,431
Location
Wisconsin
Looking good!

Any pointers on paint correcting? I’m teaching myself how to do this, and using my truck as the test subject I’ve a got a the chemical guys da polisher along with a few different cutting/polishing pads. For compound I’ve just got mothers ultimate compound.
Couple professionals in the Show N Shine Saloon who could help you out with some tips.

Basically, the standard rule of thumb is to test different compounds, pads, and speeds to see what combination gives you the best/desired results. Remember that the more aggressive you go with the compound and pad, the more steps you should take in order to finish it properly. It's the same concept as sandpaper; you begin with coarse grit and finish it with fine. Once you've got the imperfections worked out you can look at finishing it with a polish (light correction properties), glaze (basically fills in fine imperfections) and/or wax. If you opt for a heartier final coating like a ceramic, it's a good idea to first wipe the panels down with a diluted alcohol solution to promote bonding. It's a science. lol The same combination of products doesn't always work on every vehicle thanks to differences in paint characteristics either so there's no "one size fits all" answer.
 

hatchke

Well-Known Member
Established Member
Joined
Mar 26, 2017
Messages
276
Location
Nashville, TN
Wonder if it has a upgraded 26 spline input shaft? Mine developed a noise just like that on cold start after I did the 26 spline shaft/clutch install in my 03. Pulled the tranny back out and added a extra .001" shim (.031 to .032) on the input shaft bearing and the noise went away. Just a thought.

I definitely haven't checked for that. I've poked around in the inspection cover on mine a decent bit but haven't even checked to see if I can get a visual on that. I would assume I couldn't, but at the same time it appears that the 10-spline shafts have the splines extend back further on the shaft than the 26-splines i've seen, so maybe?

I should have some time to get back under the car this evening so i'll at least have some time to stethoscope around some more.

Looking good!

Any pointers on paint correcting? I’m teaching myself how to do this, and using my truck as the test subject I’ve a got a the chemical guys da polisher along with a few different cutting/polishing pads. For compound I’ve just got mothers ultimate compound.


Sent from my iPhone using the svtperformance.com mobile app

I'd definitely go with what @TerminatoRS was suggesting and get some pro help. I've had to play around with a few different compounds and pads but ultimately had to experiment on the car while I was going. I finally got to what I would use *next* time I do the car but every car/color is different.

On mine I used Menzerna compounds and Cobra cross groove pads - a 400 heavy cut and then skipped up to a 3800 super finish plus. I should have done a middle stage but that'll be next time. I'll use an orange Cobra cross groove for a cut, a white for the 2500 and then orange for the 3800. Black pad for wax application (assuming I don't do something more extreme like a ceramic next time).

Generally i'd say play with the speeds, don't let the pads get too hot like I did (or use pads that are too old) and experiment on a more inconspicuous spot until you get the scratch or swirl reduction you're looking for. I'm about 90% happy with mine given how bad it was to start, so it couldn't honestly have gotten much worse.
 

TerminatoRS

Well-Known Member
Established Member
Premium Member
Party Liquor Posse
Joined
Jul 29, 2019
Messages
2,431
Location
Wisconsin
@hatchke
Just curious... Compared to other vehicles you've done paint correction on, does the Cobra's paint seem to be harder in terms of requiring more aggressive products to get the imperfections out? I went over mine last spring and am still not fully satisfied with the outcome. I was apprehensive to go heavy at it considering she's getting to be an older gal and I'm not sure how much cutting has been done by the previous owner(s). As reference, I did my former 2016 Focus RS and the results were awesome simply by using Meguiar's Ultimate Compound with a medium-light pad, their matching polish and synthetic wax, and finished with The Sauce Pro. Two totally different paints in my experience.
 

hatchke

Well-Known Member
Established Member
Joined
Mar 26, 2017
Messages
276
Location
Nashville, TN
@TerminatoRS yeah i'd definitely consider it on the harder side of paint that i've worked with. I tried the 2500 first thinking it'd be enough, and then was surprised when even the 400 hard cut took some working. On a red VW I had a few years ago I had plenty of swirls and did a single stage polish and it was all I needed. I've also heard that VW paint can be soft/thin so I was really safe.
 

hatchke

Well-Known Member
Established Member
Joined
Mar 26, 2017
Messages
276
Location
Nashville, TN
Might be turning into more of a project than intended. Picked up a few things this week: got my Ballenger Motorsports A/F setup, perfect condition rear bumper from a parts recycler, etc. Excited to be making some progress but I continued to dig into the cold start ticking and it's definitely in the bottom-end and focused on the driver's side.

I finally got some help and the stethoscope on the freeze plugs on by the header and I can hear it super clearly. Not through the exhaust as much, not from the trans or oil pan, but on the block itself.

Pulled the plugs (5 & 6 looked like they're running lean) and 7 & 8 were whatever. I popped the bore scope down each cylinder and not really liking what i'm seeing (and honestly a little confused)

Definitely some scoring in 6, which was the cyl with the lowest compression.
51890599205_dd1cfc034d_b.jpg


What i'm confused about are these little particles or metal (maybe?) chunks sitting in each of the cylinder
51890599205_dd1cfc034d_b.jpg


51889946391_b4dac179fa_b.jpg


51890034018_d0fd8d4655_b.jpg


51888983267_eb70f24632_b.jpg


8 was at TDC so I couldn't get a good look at it but it's WAY filthy compared to all other pistons. I'll rotate it around and check out 8 tomorrow as well as get a leakdown tester. Didn't see any metal in the oil change I did, but maybe i'll cut open the old filter and check that too.

I'll wait until I do the leakdown to be more certain, but seems like I may be needing to build/rebuild a short block?

Depending on how bad/good it is, I guess i'll have a few options to pick from. Due to the otherwise decently running nature of the vehicle and the fact that the sound disappears, I still wonder if the noise is piston slap.
 
Last edited:

hatchke

Well-Known Member
Established Member
Joined
Mar 26, 2017
Messages
276
Location
Nashville, TN
Yeah. Leak down test did not go well. Ran it with a totally cold motor.

Passenger side was all golden like the compression was - all just a few pts variation and all between 2% and 6%

Driver's was a different story:

5 - 16%
6 - 12%
7 - 25%
8 - 7%

I'm pretty certain the noise is from cyl #7 as that's the freeze plug where I could hear it the loudest too. I ran the driver's side over and over again, same results within a few pts consistently. I feel like I can hear the noise within the valve cover itself the loudest when the cylinder is pressurized.

I'm pretty burnt on it today so I'll try to pinpoint sounds tomorrow when I'm a little more fresh. At this point I guess I need to make some calls on what to do next. Car has 75k on it but the motor is obviously not healthy so do I go ahead and do a total fresh rebuild or decide to dig in deeper and see if maybe its "just" problems with the head itself.
 

hatchke

Well-Known Member
Established Member
Joined
Mar 26, 2017
Messages
276
Location
Nashville, TN
After spending a little more time I can definitely hear air come up through the head and within the valve cover. All a pretty big bummer, but that's the game when you don't do appropriate PPI before buying a car. Lesson learned for sure, I got out in front of my skis a little bit for sure.

I found an '03 long block for sale w/ 50k miles on it so current plan is to pick that up this weekend (after I do a leak down) and swap that in over the next couple weeks to have the car still moving/driving while I tear down the original motor. I'll assess what i'm working with when I get in there, but may be a good base for an OEM+ build/refresh. Rebuild using the stock crank, rods, throw in some higher comp forged pistons and refresh the heads.

Compression was a touch lower in #6 than the others, so i'll have to see how bad the scoring in that cylinder is and go from there.

Also all a good opportunity to do a clutch, 26-spline, etc. Even though I don't need them at current power levels, i've considered doing some mid-length or longtubes while the driveline will be out anyway.
 
Last edited:

hatchke

Well-Known Member
Established Member
Joined
Mar 26, 2017
Messages
276
Location
Nashville, TN
Keeping up with the updates as I can. Picked up a few things over the weekend.

51908645933_ff5cdf4fbe_b.jpg


51907584392_04bb445dae_b.jpg


Leak down on the motor came back totally good. Everything was all within 5% of one another including 7 & 8. 7 had the most with 7-8% and also the tiniest bit of scoring. Nothing that deeply concerns me for a motor with 50k on it. I'll be starting the initial work of swapping - maybe this weekend after more parts make it in.

Only things I was really planning to do with the motor out is a new clutch/flywheel with input shaft and associated driveline bits, MMR head cooling mod, along with the longtubes. Besides that i'm just replacing all the gaskets with new OEM ford stuff as I transfer over from old motor to new.

Is there anything else I should absolutely do while I'm in this position, besides what I was planning out?
 

hatchke

Well-Known Member
Established Member
Joined
Mar 26, 2017
Messages
276
Location
Nashville, TN
Getting the party all kicked off. Radiator, reservoir tanks and lower cage all off now. Thinking i'm going to pull everything out through the top and try to leave the blower, etc on still. Waiting on a few last gaskets and bits from MMR but think I have everything in now.

Thankfully the lower cage wasn't that bad to get off. Fought it a little bit but it gave in. It appears that it's definitely been off before due to a visible ding on the top edge of one of the arms. Probably used a big chisel/etc and hammered it to pop it loose.

51920666477_5e0f5e727a_b.jpg


51922256455_114db03174_b.jpg


Check that coolant color too :barf:
 

Roots-type

+displacement
Established Member
Joined
Apr 26, 2008
Messages
2,926
Location
Tx
The coolant looks like somebody was a bit overzealous with the stop leak
 

03' White Snake

Well-Known Member
Established Member
Joined
Feb 5, 2007
Messages
3,870
Location
Mass
Pull the blower off to lift it out the top. That’s probably the easiest part of the removal. Leave pulley bridge all attached. Remove ac pump but do not undo lines, it can stay pressurized on the car, same with power steering pump. I’ve had mine out before, took me 5-6 hrs total to get mine out by myself taking my time.

8EF315F8-4022-48A0-A95B-0E68C4D712A6.jpeg

87882007-78AE-4E58-A676-495F81B28868.jpeg
 

hatchke

Well-Known Member
Established Member
Joined
Mar 26, 2017
Messages
276
Location
Nashville, TN
That's super helpful - thank you. I have everything removed now except for the a/c compressor right now and the driveshaft. I've been going back and forth trying to break up the work between above/below the car. So far it's all been pretty smooth.

I do need to remove the trans too, for the input shaft, etc. Would you remove it from the top all in one piece @03' White Snake - the same way just using a steeper angle to clear?
 

03' White Snake

Well-Known Member
Established Member
Joined
Feb 5, 2007
Messages
3,870
Location
Mass
That's super helpful - thank you. I have everything removed now except for the a/c compressor right now and the driveshaft. I've been going back and forth trying to break up the work between above/below the car. So far it's all been pretty smooth.

I do need to remove the trans too, for the input shaft, etc. Would you remove it from the top all in one piece @03' White Snake - the same way just using a steeper angle to clear?

I always remove the trans first. I put a rubber glove over the output shaft to catch any fluid and lower it to the ground. My cheap HF load lever is hard enough to tilt the engine without the trans on there. But it could be done.

Another tip, leave the power harness on the engine. Unplug everything near the battery and let the harness go with the engine. Same with the engine harness. Remember the ground strap on the motor mount too. A lot of people break that.
 

hatchke

Well-Known Member
Established Member
Joined
Mar 26, 2017
Messages
276
Location
Nashville, TN
I always remove the trans first. I put a rubber glove over the output shaft to catch any fluid and lower it to the ground. My cheap HF load lever is hard enough to tilt the engine without the trans on there. But it could be done.

Another tip, leave the power harness on the engine. Unplug everything near the battery and let the harness go with the engine. Same with the engine harness. Remember the ground strap on the motor mount too. A lot of people break that.

Ok great, definitely appreciate the tips and help.
 

hatchke

Well-Known Member
Established Member
Joined
Mar 26, 2017
Messages
276
Location
Nashville, TN
Making some good progress finally. Left everything as a single piece and came out the top very smoothly. Used this lift plate from motion raceworks - Motion Raceworks Ford Modular 4V 4.6 Engine Lift Plate w/ M6 Bolts and made life really easy.

Really no drama getting the driveline out at all. Time to start swapping things over and hopefully be back on the ground in 2-3 weekends at my current pace. Have all the parts I need save for the inner accessory belt and the correctly sized supercharger belt (I didn't measure correctly, ugh)

51944209015_88cf850e30_b.jpg


51943918619_9af90e621d_b.jpg


51943918589_4caa5920aa_b.jpg
 

Users who are viewing this thread


Top