Black Gold 380R's 65 Mustang Build Thread

Black Gold 380R

Multiple SVT Collector
Established Member
Joined
Feb 28, 2008
Messages
5,713
Location
El Paso, TX
Then it was time to install the hood. Obviously I couldn't take pictures during this process. I had my neighbor come over and help me get the hood onto the hinges. Once that was done it took me a little while to make the adjustments to get the hood where it needed to be.

20220319_113149.jpg


20220319_112325.jpg


20220319_112334.jpg


20220319_112340.jpg


20220319_112348.jpg


I got everything adjusted as well as I could. Once I got to this part it became a pick my poison deal.

Since this is a fiberglass hood it is not perfect. So, I left this gap between the rear of the hood and passenger side fender a little wider than I would like. But, when I tried to make it right here it would be off someplace else. So, overall, I can live with this since it is towards the back of the hood.

It looks worse in the picture than it really is due to the angle I took the picture. If you look at the passenger side gap line in the picture above you will see it really isn't that bad. Besides, the hood will be up most of the time anyway.
20220319_112405.jpg
 

Black Gold 380R

Multiple SVT Collector
Established Member
Joined
Feb 28, 2008
Messages
5,713
Location
El Paso, TX
Then it was time to remove the tape, clean it up and take some overall shots.

20220319_115032.jpg


20220319_115325.jpg


As mentioned, from this angle you can see the gap is larger than I would like, but it is not that bad visually.
20220319_115045.jpg


20220319_115038.jpg


Even from this angle the gap on the driver's side looks huge, but it's not.
20220319_115131.jpg


I love this shot. You can see the stacks reflecting in the bottom of the hood. Also, you can see how well the body grommets cleaned up those holes in the underside of the hood. This thing is starting to come together......(y)
20220319_115706.jpg
 

ToddW702

Well-Known Member
Established Member
Joined
Jan 21, 2014
Messages
666
Location
TX
Looks so good, Glen. The fasteners, hinges and engine combined with the perfect paint make that jewelry box pop.

You may want to use a little bit of vacuum hose split down the middle for the radiator hose opening. It works good for protection and to clean up the cut.

It’s getting close, I know you must be excited. I know I am.


Sent from my iPhone using svtperformance.com
 

biminiLX

never stock
Established Member
Premium Member
Joined
Jan 17, 2003
Messages
13,317
Location
Toledo, OH
Can almost put a mirror on the underside of the hood. Just like the one over your waterbed :)
Liking the progress, going to look good out in the sun.
-J
 

Black Gold 380R

Multiple SVT Collector
Established Member
Joined
Feb 28, 2008
Messages
5,713
Location
El Paso, TX
Looks so good, Glen. The fasteners, hinges and engine combined with the perfect paint make that jewelry box pop.

You may want to use a little bit of vacuum hose split down the middle for the radiator hose opening. It works good for protection and to clean up the cut.

It’s getting close, I know you must be excited. I know I am.

Thank you Todd! Yes sir, It's really coming together. Seeing all those parts together makes for quite a visual feast LOL. Yes sir, just a few more body parts and the tune and I will be at the end of this 2 year journey.

That's a great idea Todd. I liked it so much I went into the garage right now to see how it would look LOL. I'm liking it.

20220319_195138.jpg


20220319_195150.jpg


20220319_195202.jpg
 

geoffmt

Well-Known Member
Established Member
Premium Member
Joined
Jul 30, 2015
Messages
2,024
Location
billings, mt
Little grommets and edge protection are great attention to detail and have the benefit of hiding some imperfections (hood pins). It’s just like adding wire loom around wires, just completes it. You will always want grommets Around wires passing through body panels/firewalls, so it looks completed with the hose around the radiator line. The light is getting bright! This is beautiful


Sent from my iPhone using svtperformance.com
 

Black Gold 380R

Multiple SVT Collector
Established Member
Joined
Feb 28, 2008
Messages
5,713
Location
El Paso, TX
Looks really good, Glenn. The hood gaps look just fine to my eyes.

Thank you Bob! Really appreciate that. However, when you see it in person you can tell the gap on the passenger side is not a nice/tight as the driver's side. It doesn't look bad, but those who pay attention to those kinds of details will notice.
Good thing the hood will be up most of the time during car shows LOL.
 

Black Gold 380R

Multiple SVT Collector
Established Member
Joined
Feb 28, 2008
Messages
5,713
Location
El Paso, TX
Nice. Definitely gives it a finished look. The car is going to be stunning.


Sent from my iPhone using svtperformance.com

Thank you Todd! As I have said before, I don't know everything and I don't think of everything. So, I appreciate when fellow SVTP members make suggestions or give their idea on something.

So, thank you for yours. It was a great suggestion!
 

Black Gold 380R

Multiple SVT Collector
Established Member
Joined
Feb 28, 2008
Messages
5,713
Location
El Paso, TX
Little grommets and edge protection are great attention to detail and have the benefit of hiding some imperfections (hood pins). It’s just like adding wire loom around wires, just completes it. You will always want grommets Around wires passing through body panels/firewalls, so it looks completed with the hose around the radiator line. The light is getting bright! This is beautiful


Sent from my iPhone using svtperformance.com

I agree with you 100% Geoff. I would love to sit here and say I have an eye for detail and that's why I put those grommets in the hood. Yes, grommets and wire loom are detail items, but it was done to cover up someone else's mistake/crappy workmanship LMAO!!! The good thing is when someone sees it they will appreciate it rather than saying look at that crappy hole they made for the hood pins LMAO!!!

I agree with you. That light is getting really bright now.
 

Black Gold 380R

Multiple SVT Collector
Established Member
Joined
Feb 28, 2008
Messages
5,713
Location
El Paso, TX
Okay Everyone,

We have reached a point that every time I put something on the car it is for the last time. Which means I'm getting closer to the end with every weekend that passes. SWEET!!!

Today I did more work on the front end. I got the stone guard and front bumper installed. The front bumper was a happy accident. I was trying to install my bumper brackets. Since the bumper bolts where shaved I was going to set the bumper on top of the brackets in order to adjust them. However, since the bolts have been shaved I cannot install the bumper that way now. I need to install the brackets on the bumper first and then install the bumper/brackets on to the car.

So, the first thing I did was paint the bumper brackets and then installed then on the car thinking I could do it this way. WRONG, not with welded/shave bolts. LMAO!!!!

20220319_143556.jpg


20220319_143605.jpg


20220319_152326.jpg


That hose hanging down is my P/S return line. I hooked it up. I needed to get a smaller hose clamp before I could install it.
20220319_152341.jpg
 

Black Gold 380R

Multiple SVT Collector
Established Member
Joined
Feb 28, 2008
Messages
5,713
Location
El Paso, TX
Then I got to work on the stone guard and bumper.

Here you can see the orange peel in the stone guard. I'm tired of dealing with orange peel already LOL.
20220320_093820.jpg


This is after the sanding process was finished Ready to polish.
20220320_100937.jpg


Now it's looking good.
20220320_103318.jpg


Always love when parts look like this.
20220320_103444.jpg


You guys are probably just as tired of seeing the process as I am LOL So, here is the bumper finished.
20220320_133450.jpg


20220320_133517.jpg


Here is the stone guard put in place. You can see the difference in the brackets. Which is why I wanted to set the bumper in place in order to adjust things, but then I found out the bumper was NOT going on this way.

Here on the passenger side the brackets look right.
20220320_111722.jpg


However, here on the driver's side the brackets look like they are sticking out too far. Time to figure this out and get the bumper installed.
20220320_111729.jpg
 

Black Gold 380R

Multiple SVT Collector
Established Member
Joined
Feb 28, 2008
Messages
5,713
Location
El Paso, TX
I then removed the brackets, installed them on the bumper and then installed the bumper with the brackets attached and that worked great. I needed to modify the driver's side brackets to get them to push back a little more and then the gap was much better.

Now this is looking awesome!

I put tape on the stone guard and the bumper during installation to help protect from possible damage. BTW, those with sharp eyes will notice I have my hood pins in place now. Still need to get the top plates (pieces on top of the hood) painted and installed and then the hood pin installation will be complete.
20220320_135209.jpg


Now this is looking great! It's really starting to come together. I'll try to get the lower valance installed next weekend.
20220320_145348.jpg


Man, look at that color with the sun hitting it. Woo Hoo!!!
20220320_145410.jpg


20220320_145453.jpg


20220320_145510.jpg


20220320_145549.jpg


20220320_145557.jpg
 

CobraBob

Authorized Vendor
Established Member
Premium Member
Single Barrel Sirs
Joined
Nov 17, 2002
Messages
105,726
Location
Cheshire, CT
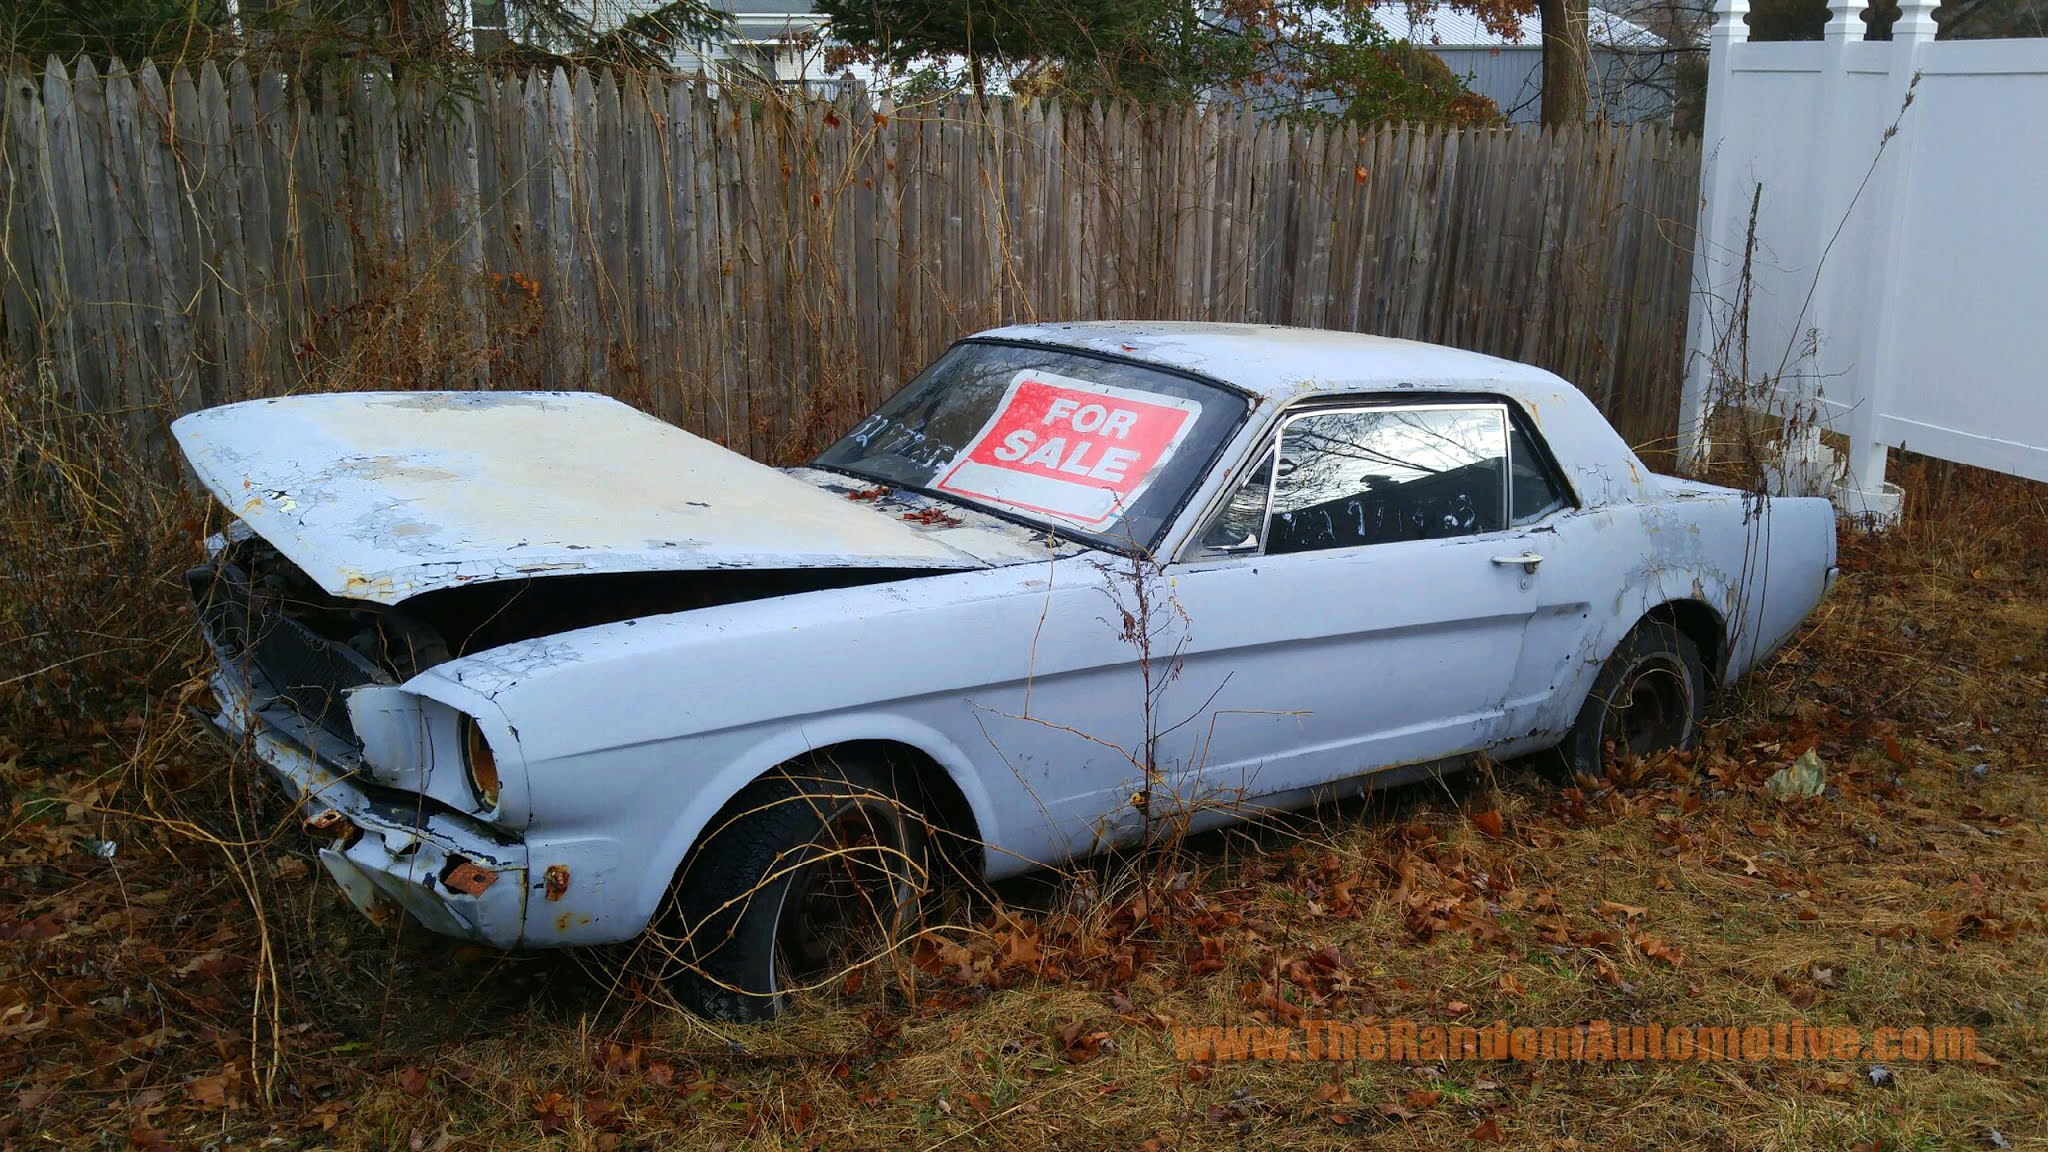
Now that you're this far along, here's a pic I found of an abandoned '65 Mustang in, well, distressed condition. Should make you even MORE thankful for where yours is at.

1965Mustang_Blog1.jpg
 

Black Gold 380R

Multiple SVT Collector
Established Member
Joined
Feb 28, 2008
Messages
5,713
Location
El Paso, TX
Now that you're this far along, here's a pic I found of an abandoned '65 Mustang in, well, distressed condition. Should make you even MORE thankful for where yours is at.

1965Mustang_Blog1.jpg

LMAO!!! Thanks Bob, but if I need that kind of motivation all I need to do is go back to page one of this thread. Think mine was in worse shape LOL. Check it out. The tow truck driver needed to use a dolly on the rear wheels as they were locked solid....

65 01.jpg


This was after it was blasted and etching primer was applied to keep it from flash rusting. What a POS it was. You can see the springs were heated to get them to lower. Think my bro did that. That's his kind of modifying to save money on buying new springs LOL.
65 02.jpg


Damn! Have I come a long way since then (y)
 

Black Gold 380R

Multiple SVT Collector
Established Member
Joined
Feb 28, 2008
Messages
5,713
Location
El Paso, TX
Woo Hoo!

Just got a call from Dave Kindig. He told me that the parts he is manufacturing for me have been CNC'd. He said the K&N air filters should be in tomorrow.

He said he wants to send me the parts and for me to test fit them. Once everything checks out he wants me to send them back to him so he can do the finishing on them.

These should be billet pieces. So, if they fit I believe he wants them back to do the polishing process.

I mentioned to him, again, that once the parts are 100% complete I want to go to his shop and pick them up. He said he would coordinate with me to ensure he will be in the office when I go up there.

SWEET!!! This is awesome. Yeah, I know I'm goofy LMAO!!!!
 

CobraBob

Authorized Vendor
Established Member
Premium Member
Single Barrel Sirs
Joined
Nov 17, 2002
Messages
105,726
Location
Cheshire, CT
LMAO!!! Thanks Bob, but if I need that kind of motivation all I need to do is go back to page one of this thread. Think mine was in worse shape LOL. Check it out. The tow truck driver needed to use a dolly on the rear wheels as they were locked solid....

View attachment 1742674

This was after it was blasted and etching primer was applied to keep it from flash rusting. What a POS it was. You can see the springs were heated to get them to lower. Think my bro did that. That's his kind of modifying to save money on buying new springs LOL.
View attachment 1742675

Damn! Have I come a long way since then (y)
This thread has grown so much that I forgot that pic. Yeah, that about on par with the one I posted. LOL.
 

Users who are viewing this thread


Top