You are using an out of date browser. It may not display this or other websites correctly.
You should upgrade or use an alternative browser.
You should upgrade or use an alternative browser.
Need some help on swirl marks in a black vehicle
- Thread starter 188slo50
- Start date
I JUST finished preparing my black car for a car show that was held yesterday and this was my second attempt at polishing a car. First attempt was last Fall and failed miserably when seen in direct sunlight the day before my very first car show. It took me 6 months of researching before I finally found the info I needed to produce a swirl free paint job which took me about 4 hours a night for the last 6-8 weeks of polishing.
I don't know if you want to go into this much detail for your car but if you do let me know and I can write a VERY detailed process with chemicals, materials, buffing pads, microfiber cloths, buffing RPM's, etc. For a black car it will be VERY VERY good. It requires a lot of different chemicals at various steps but if you want a near perfect black paint I can get you pointed in the direction that worked on MY CAR.
ks
I JUST finished preparing my black car for a car show that was held yesterday and this was my second attempt at polishing a car. First attempt was last Fall and failed miserably when seen in direct sunlight the day before my very first car show. It took me 6 months of researching before I finally found the info I needed to produce a swirl free paint job which took me about 4 hours a night for the last 6-8 weeks of polishing.
I don't know if you want to go into this much detail for your car but if you do let me know and I can write a VERY detailed process with chemicals, materials, buffing pads, microfiber cloths, buffing RPM's, etc. For a black car it will be VERY VERY good. It requires a lot of different chemicals at various steps but if you want a near perfect black paint I can get you pointed in the direction that worked on MY CAR.
ks
Post up your technique Kev. Always interested in different processes for black cars since maintaining them is a full time job lol.
Post up your technique Kev. Always interested in different processes for black cars since maintaining them is a full time job lol.
Ok.
It'll take me some time to write it all up but I'll do it.
As a side note a Corvette owner next to me at the show had is car ceramic coated (Opti-Coating) and highly recommended it to prevent scratches occurring during washing. My car is not a show car but being black I dread washing it now for fear of creating any type of scratch, so I'm looking into this process for added protection.
ks
Thanks! Was looking into the ceramic coating for my black Cobra as well just worried about sealing in holograms from the polishing process thus the reason im always looking for polishing techniques.
Thanks! Was looking into the ceramic coating for my black Cobra as well just worried about sealing in holograms from the polishing process thus the reason im always looking for polishing techniques.
I'm still researching it so take what a say lightly but the place that did the Vette stripped the paint of any waxes, etc then "color corrected the paint" (whatever this means) then polished it. Then applied the ceramic coating.
There were NO swirl marks anywhere which makes sense b/c the coating is a wet, clear 2-part "epoxy" that dries. When you wet your car with water you can't see the swirl marks b/c of the water. This ceramic coating appears the same way on the paint but dries hard which fills, covers or hides the swirl marks.
ks
Ceramic coatings will not fill, cover or hide any swirls, scratches, marring, defects, etc. FYI: If anyone tells you they do, run! Do not use them.
Also, I do not know of any 'epoxy' ceramic coatings.
Color correcting is a term used (improperly, IMO) to describe paint correction. Color correction is a term more geared at wet sanding/color sanding fresh paint.
Also, ceramic coatings will NOT prevent scratches/marring/swirls from improper wash technique/methods. You still need to perform proper maintenance in order to properly maintain a coated vehicle.
Hope this sheds some light on this subject gents!
Ceramic coatings will not fill, cover or hide any swirls, scratches, marring, defects, etc. FYI: If anyone tells you they do, run! Do not use them.
Also, I do not know of any 'epoxy' ceramic coatings.
Color correcting is a term used (improperly, IMO) to describe paint correction. Color correction is a term more geared at wet sanding/color sanding fresh paint.
Also, ceramic coatings will NOT prevent scratches/marring/swirls from improper wash technique/methods. You still need to perform proper maintenance in order to properly maintain a coated vehicle.
Hope this sheds some light on this subject gents!
FYI, I wasn't claiming it was epoxy. I was simply describing it as a 2-part mixture like an epoxy thinking that people would understand what I was trying to convey with minimal words. Apparently I failed.
I've seen vids, postings, etc that claim it gives a harder protective finish. If it doesn't offer this then it doesn't offer anything I don't already have and it's not worth 2 cents to me unless I'm missing something.
However, this is taken directly off the Opti-Coat website:
"Opti-Coat Pro Plus is an enhanced 2 step version of Opti-Coat Pro. The first step, Opti-Coat Pro, is a ceramic clear coating with superior resistance to scratching, chemical etching, fading due to UV and provides outstanding release properties. Opti-Coat Pro Plus adds great gloss and slickness for a fantastic shine and long term paint protection with a 7 year warranty."
http://www.opticoat.com/page/opti-coat-pro-plus
ks
Here is a series of articles that discuss why you should and shouldn't use coatings, sealants etc. worth reading all 4 to tune out some of the marketing noise prevalent in the world of detailing and make choices that fit your needs and expectations.
I am not a pro like Nasty(his stuff rocks on multiple forums) just a hobby detailer, as always YMMV.
http://www.detailedimage.com/Ask-a-Pro/the-case-against-coatings-part-1-of-4/
I am not a pro like Nasty(his stuff rocks on multiple forums) just a hobby detailer, as always YMMV.
http://www.detailedimage.com/Ask-a-Pro/the-case-against-coatings-part-1-of-4/
FYI, I wasn't claiming it was epoxy. I was simply describing it as a 2-part mixture like an epoxy thinking that people would understand what I was trying to convey with minimal words. Apparently I failed.
I've seen vids, postings, etc that claim it gives a harder protective finish. If it doesn't offer this then it doesn't offer anything I don't already have and it's not worth 2 cents to me unless I'm missing something.
However, this is taken directly off the Opti-Coat website:
"Opti-Coat Pro Plus is an enhanced 2 step version of Opti-Coat Pro. The first step, Opti-Coat Pro, is a ceramic clear coating with superior resistance to scratching, chemical etching, fading due to UV and provides outstanding release properties. Opti-Coat Pro Plus adds great gloss and slickness for a fantastic shine and long term paint protection with a 7 year warranty."
http://www.opticoat.com/page/opti-coat-pro-plus
ks
Hope my response wasn't taken as bashing/attacking you KEVINS. It was not meant to come across like that.
I understand your reason for posting that now...just didn't get it the first time.
I haven't looked at the link/articles that M91196 posted yet...
However, there is a lot of mis-information/marketing hype/etc (IMO) about coatings in general. Having used quite a few of them and from using them on a regular basis is what I was basing my info/response on.
Again, IMO, the descriptions on some of these can cover quite a broad area: 'superior', 'resistant', etc, etc. ----NOW, they do indeed provide quite a bit of 'protection' (my description) from fallout, UV, release properties are killer, hydrophobic properties are outstanding, some are slick, some are grabby, some bead up, some sheet water----and they will offer some degree of scratch/swirl resistance WITH proper care and maintenance. And...they last quite a long time. Maintenance clean up are a breeze. Etc, etc.
They are not the be all end all/magic solution that some will lead you to believe they are.
The warranties are also to be closely looked at to see what it entailed to keep the warranty intact and what it covers. (and I do not know of any that have been fully tested for their 5/7/10 years of claimed warranty coverage)
****Now having said all that: ALL of my vehicles are coated in some type of coating. I find that they are amazing in what they offer and do. I would not want to have anything else on my vehicles.****
I'm just trying to put some additional information out there to help everyone make a decision on what they need/want as well as let you know what these coatings can actually do.
I hope I have helped a bit anyway!
Scott
I didn't take it that way at all... no issues here.Hope my response wasn't taken as bashing/attacking you KEVINS. It was not meant to come across like that.
Scott
What I have learned about the ceramic coatings comes from a 1 hour conversation yesterday and a few web searches last night. Up until yesterday I've never heard of it so the researching is just starting and all info and experiences is greatly appreciated.
I use the mcguires DA system, microfiber pads and the pink correction compound. It's awesome!! Followed by a good wax using the DA. Shine an LED over the paint that you just used the compound on, once the swirls are gone it's time to wax. Quick and easy
I want to say up front that the below process and materials worked on MY car. I'm sure there are others that will criticize, complain, correct, bitch or tell me how I could have done it better or how wrong I did it but I don't want to hear it. I tried several different methods, Pads and a few different polishes and the below gave me a swirl free finish in areas that I would grade a 9.5 out of 10 on my own personal car-show scale. I grew up around show cars and my dad has won Best Paint several times at the World of Wheels car show many years ago so I have an idea what a good paint job looks like.
My car has been repainted the factory color black and whoever painted the car did a crappy job of it so I was not trying to "fix" the paint. I only wanted to know how to polish it and not leave ANY swirl marks and I have proven to myself that the below process will do that on MY car. Use at your own discretion.
Most of the Materials I used were bought on Amazon.
Materials Used:
Buffer: Dewalt variable speed, Single Action. I did not use a dual action buffer.
2 different Polishing Pads: (1) 3M Perfect-It 8" Ultrafine Foam Polishing Pad P/N 05733-Blue and (2) 3M Perfect-It 8" Foam Compounding Pad P/N 05737-White
3m Rubbing Compound p/n 36060
Mequiars 205 Mirror Glaze
(Optional - Chemical Guys GAP-V38 Optical Grade Final Polish)
Microfiber Towel: Chemical Guys MIC35106 Happy Ending Edgeless, Red (16 in. x 16 in.) QTY 6 Minimum.
Poorboy's Black Hole Show Glaze
Poorboys Blue Nattys Paste Wax
CarPro Eraser Intense Oil & Polish Cleanser 500ml. Qty: 2 bottles min.
Small LED Pen light
Weather Temp: No higher than 85*. I tried polishing when the temps were higher (95*) and could NOT get the finish I wanted....UNLESS I had a fan blowing on the panel to keep it cooler.
Painters Tape to tape off edges and trim.
**************************************
I polished my car last year so the paint was already smooth and clean so I did not do any wet sanding.
1. Clean the panel real good with one of the above Microfiber towels and the CarPro Eraser to remove any polish or wax. You want to make sure that you're only working the paint and nothing is on top of it. Use ONLY that ONE towel for cleaning. Do NOT use it for later steps below. Designate each towel for a specific job and never mix them up. Getting a minimum of 6 towels is recommended more is better. If you drop one do not use it. Wash the dirty towels in Hot water every night they still remain incredibly soft even after about 20 washes.
2. Use the 3M White foam pad.
3. Place 5 spots (about the size of a nickle) of the 3M Rubbing Compound p/n 36060 in an area about 18"-24" square.
Note: The Autobody Supply shop sold me this compound last year and I don't know how it compares to other compounds but since I had a large bottle I decided to use it. I'm using this to simply clean the surface and to get the surface to a constant "texture/finish" and remove water spots and it worked great for me.
4. Initially use the buffer at 600 rpm to evenly distribute the rubbing compound on the 18-24" area that you want to polish.
5. Once the polish is evenly distributed speed the RPM's up to 1700rpm and polish that 18-24" area for 8-10 minutes. DO NOT re-apply more compound! Work those 5 dots of compound for 8-10 minutes. The foam pad will NOT scratch the paint. Just keep polishing.
Note: Moving the buffer Side to Side is really slow. I take about 4-6 seconds to move 18-24" maybe faster at times maybe slower at times but I got better results if I kept the movement slower.
6. After the 8-10 minutes is up apply 5 more dots just like above in the same area. Start at 600 RPM to evenly distribute the compound then increase the RPM to 1700 again and work the same area for another 8-10 minutes. Since the radio is on I listen to two or three songs before stopping.
7. Once the two polishing steps are done clean the polished area with a Fresh MF towel and the CarPro Eraser. ONLY use this MF Towel for wiping off this compound. Do NOT mix the towels up. Use another towel for the other compounds and keep them straight.
8. Turn the lights off in the garage and use the LED pen light and check the polishing marks to make sure they are consistent and covers the entire area that was worked. Repeat the process as needed or desired. You'll know if it needs to be done again after seeing what it looks like.
Note: This process can take out minor scratches so I used this to my advantage by repeating this process; about 4-5 times on the worst panels or areas before I even looked at it in the dark.
9. Using the designated MF Towel and CarPro Eraser wipe the panel off real good to get ALL the compound off the panel. Turn the lights off in the garage and use the LED pen light to see the compound still left on the panel (There will be some left) and wipe the panel off. Get ALL the compound off before switching pads/compounds.
10. Use the 3M Blue foam pad.
11. Place 5 spots about the size of a dime of the Meguairs 205 in the area you polished above.
12. Initially use the buffer at 600 rpm to evenly distribute the compound on the area that you want to polish.
13. Once the polish is evenly distributed speed the RPM's up to 1200rpm and polish the area for 8-10 minutes. DO NOT apply more compound! Work those 5 dots of compound for 8-10 minutes. The foam pad will NOT scratch the paint. Use the same slow movement as above.
14. After the 8-10 minutes are up Repeat Step 13 one more time but work it 10-15 minutes. The foam pad will NOT scratch the paint.
15. Using a DIFFERENT MF towel and the CarPro Eraser clean the surface and inspect it in the dark with the LED light. If you see swirl marks repeat this polishing process until you are happy with the finish. I have needed to do this process up to 5 times but the finish is great with no swirls in a lot of areas. Some areas where it's difficult to get a pad in still show some minor swirl marks, like the door handle area. See pics below.
16. Once you're happy with what you have use a fresh MF towel and squeeze some Poorboy's Black Hole Show Glaze onto the towel and VERY GENTLY smear the glaze on the paint surface. Try to evenly distribute it onto the surface.
Note: The instructions indicate that you can use a machine to apply this compound or to work it into the paint by hand. I tried working it into the paint by hand and ended up with polishing marks all over the panels and had to use the Blue pad and Meg's205 all over the panel to remove them. So my note to you is do not rub it into the surface with much pressure at all. Let this sit for about 10-15 minutes to let it dry.
17. Using another Fresh MF towel LIGHTLY wipe off the glaze. Try not to use any pressure while wiping it off. It can be difficult to wipe off in areas but just keep going over it lightly. I left marks that could be seen with the LED Light when I applied too much pressure.
18. Again, inspect the surface in the dark with the LED light and wipe off remaining glaze.
19. Using another Fresh MF towel LIGHTLY wipe Poorboys Blue Nattys Paste Wax over the paint surface of the vehicle and let dry for about 10-15 minutes.
20. Using another Fresh MF towel LIGHTLY wipe off the wax. Again No Pressure.
21. Again, inspect the surface in the dark with the LED light and wipe off remaining wax.
Notes:
Always use the CarPro Eraser before inspecting the panels. The polishes will leave a film on the surface that can hide polishing marks so make sure the surface is clean.
In place of the Meguiars 205 I read that Chemical Guys GAP-V38 Optical Grade Final Polish produces a better finish and is easier to use. Initially I used this after the Meg's 205 and initially thought it was leaving a better finish. However, I concluded that what gave it the better finish was simply polishing the surface again not the actual polish. Until I prove to myself otherwise I would grade the Meg's 205 and the Chemical Guys Polish as being equal.
Cleaning the foam pads: Just before I reuse one I would run the pad under hot water continuously working the compound out of the pores the best I could. They do not need to be real clean but i tried to get the majority of the build-up out of the pores. When polishing the car, sometimes the compound on the panel would turn to goo and when this happens I wash the pad.
ks
The two images below show my results. One shows some minor swirl marks around the door handle while the other image is pretty much swirl free which is about 24" away from the door handle.
You cannot see these swirl marks in the shade at all and you can only see them in direct sunlight at an exact viewing angle of the sun. In other words you have to be looking for them in order to see them. It actually took me several tries to see them just to photograph them.
Last edited:
And I will always tell people to use what works for them and what they like! To each their own, and it's pointless to bust balls when it works! Nice write up KEVINS.
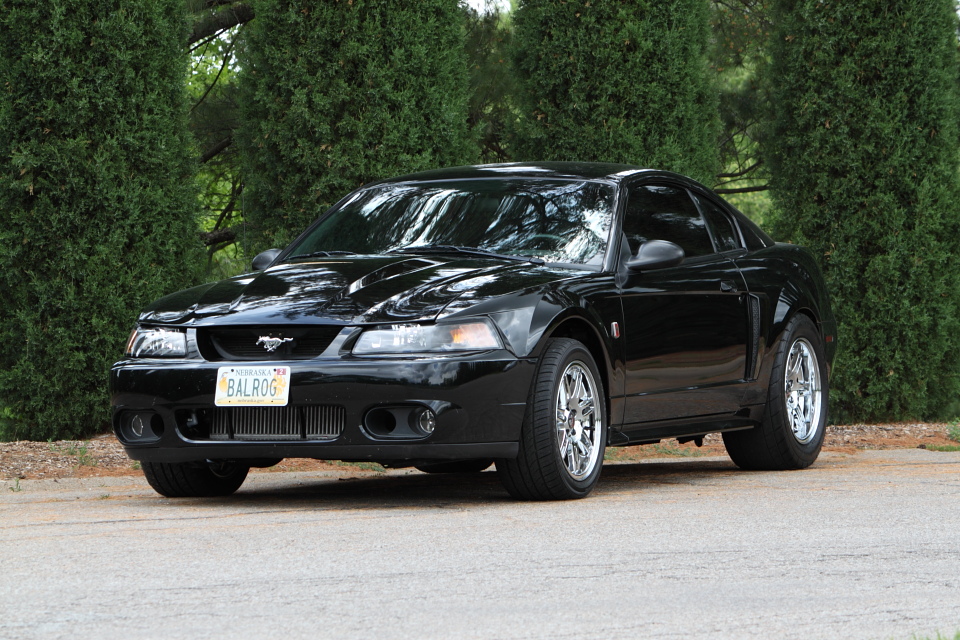
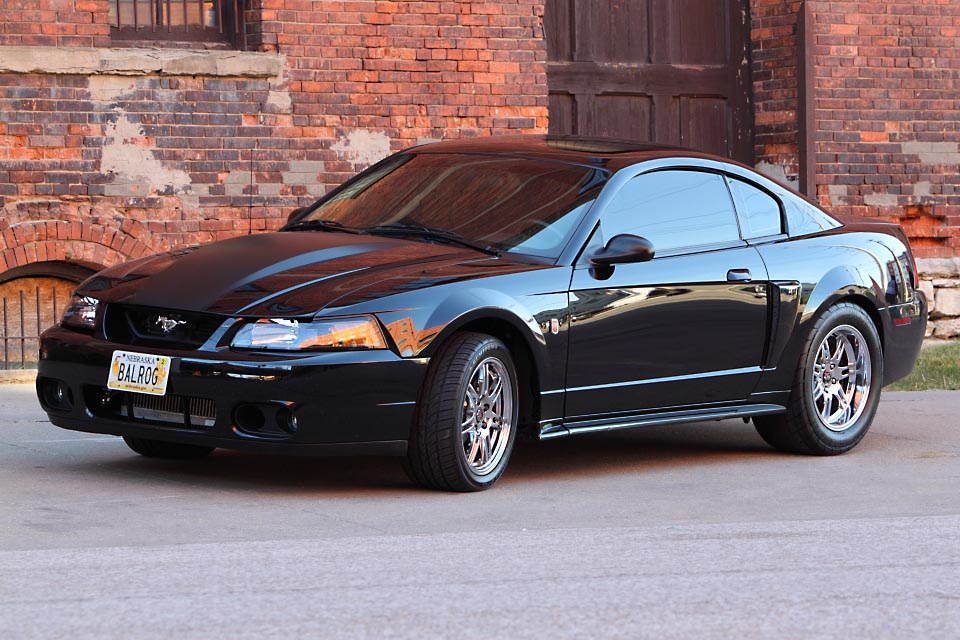
Need a shot of the whole car!!!
Need a shot of the whole car!!!
Here's the buildup of the car with a bunch of pics:
http://baselinesuspensions.com/Projects/balrog.htm
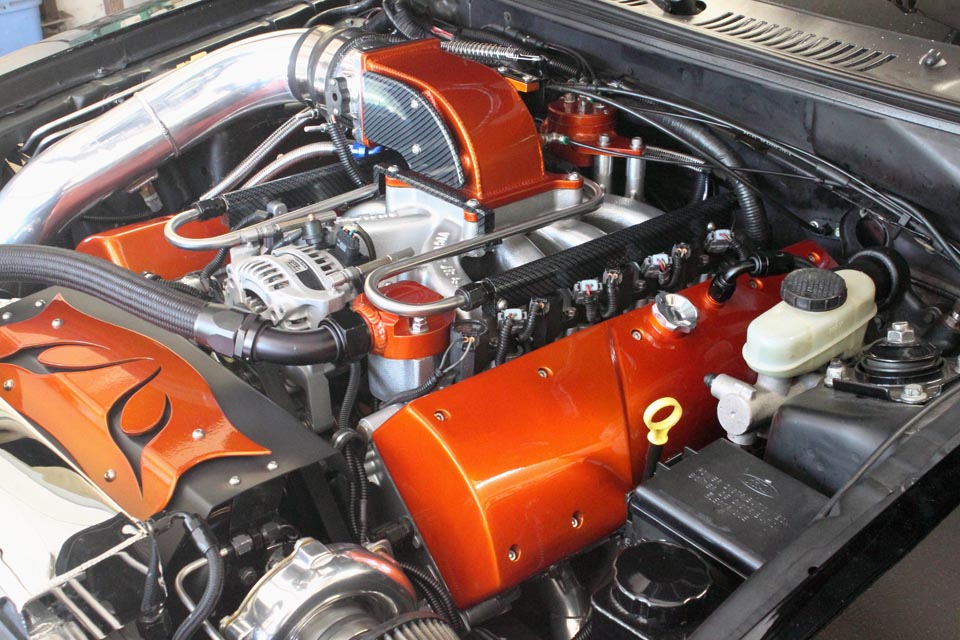
Car is a TT 2V and it dyno'd 902hp/823tq last month through the 3 mufflers (I want it quiet) and through the 4R70.
When I have some time I want to do a photoshoot at night now that it's shined up good.
Pics before the above polishing process.
http://baselinesuspensions.com/Projects/balrog.htm
Car is a TT 2V and it dyno'd 902hp/823tq last month through the 3 mufflers (I want it quiet) and through the 4R70.
When I have some time I want to do a photoshoot at night now that it's shined up good.
Pics before the above polishing process.
^^^^Thank you! That b!tch is a beast!!! Well done!!!!!
Kevn...good write up and I know that took you a minute to type up lol
Most of the technique I used, self taught off you tube. Chemical Guys have so many teaching videos. I like this one becasue of its simplicity.
As for my way of doing black cars ('12 Fusion and '08 F150) I use the same stuff no matter the color.
Wash car
Clay Bar
Rewash Car (wash away residue from clay bar and lubricants)
Porter Cable
Meguirs 105 w/ orange Hex Pad
Meguirs 205 w/ white hex pad
Chemical Guys Wet Mirror Finish w/ Black Hex Pad
Jet Seal w/ Black Hex Pad (optional if your arms aint sore yet)
Petes 50/50 Carnuba Wax 2 coats applied by hand and red applicator
Detail Car using V7 Detail spray
Maintain Car shine by using Chemical Guys Citrus Wash and Gloss car soap and DOUBLE BUCKET WASH.
When drying the car, I use micro fibers to dry and wipe down the ROOF, TOP OF TRUNK and HOOD. I than dry the rest of the car with my LEAF BLOWER.
When I wash my car, I wash the LOWER portions of the car separate from the rest of the car. This minimizes bringing dirt and debris from the lower portions up, and running the wash mit across areas like the door panel etc.
I will post a pic in a minute of my Ford Fusion that has 60k miles on it and is a Daily Driver
OPs avatar is, well, holy crap.
Users who are viewing this thread
Total: 2 (members: 0, guests: 2)

