What did you do for your Terminator today?

Black Gold 380R

Multiple SVT Collector
Established Member
Joined
Feb 28, 2008
Messages
5,675
Location
El Paso, TX
I did a couple things this past weekend.

My Dad was in a fender bender. So, I had to loan him my DD while he gets his rental car coordinated through the insurance company. So, I've been driving my Terminator (Man, I always forget how much fun this car is to drive).

So, this weekend I gave it a bath. Tires really needed a cleaning and some dressing.

Now she is looking as she should.......

20230508_092745_resized.jpg


20230508_092754_resized.jpg


20230508_092811_resized.jpg


Inked20230508_092826_resized.jpg
 

Black Gold 380R

Multiple SVT Collector
Established Member
Joined
Feb 28, 2008
Messages
5,675
Location
El Paso, TX
Now, while I was washing the car I felt a very rough texture on the hood. It felt like either overspray (from me painting the diecast cars and having the Cobra parked in front of the garage) or the hood was never cut and buffed from the paint shop and it just had a ton of dirt embedded in the paint from over the years.

Some of you may remember I purchased an original 03/04 Cobra hood that will be replacing this one. Therefore, I decided to get very aggressive and see if I could bring this hood back.

I decided to cut and buff this hood and I used the exact same procedure I did on my 65. I figured, what the hell, if I busted through the clear I'm replacing the hood anyway LOL.

So, I got to work on a mini paint correction of my hood. The results surprised even me LOL.

If you're looking at this through your phone you may not see the detail, but on a computer screen it is obvious.

Here you can see how fuzzy or distorted the reflection is in the hood.
20230507_181421_resized.jpg


In this close up you can actually see what looks like a grainy texture on the hood. At this point it does not look like overspray, but orange peel that has a massive build up of debris in the paint.
20230507_181431_resized.jpg


So, I decided to just work the center section of the hood. You can see the fuzzy reflection of my gate on the outside section of the hood and the dull center section of the hood where I started the paint correction. Passenger side.
20230507_181457_resized.jpg


Driver's side.
20230507_181513_resized.jpg


Here is the center section with the haze in it. What I did here was use my dry sanding method using my 6 inch air sander with an interface pad and the 2000 and 3000 grit dry sanding disc's. Now it is smooth as hell and feels like it should.
20230507_181536_resized.jpg


20230507_181448_resized.jpg


Then I used my 3M Trizact 8000 grit wet on my 6 inch sander using an interface pad as well. As with my 65, you can already see the gloss coming back. The reflection has a slight haze to it.
20230507_181528_resized.jpg
 

Black Gold 380R

Multiple SVT Collector
Established Member
Joined
Feb 28, 2008
Messages
5,675
Location
El Paso, TX
Then it was time to bust out my polisher and see the results.

Man, this thing came out just as good as my 65 LOL.

Here you can see how clear the center section reflection is compared to the outside reflection. Passenger side.
20230507_184546_resized.jpg


Driver's side center section compared to the outside section.
20230507_184558_resized.jpg


Damn, you can see my ugly mug now LMAO!!! You can even see the hairs on my hand.
20230507_184535_resized.jpg


I think you can actually count the bricks on my house LOL.
20230507_184627_resized.jpg


On the bottom of this picture you can actually see the jet stream from an aircraft that was flying overhead. Holy Crap!
20230507_184642_resized.jpg


20230507_184608_resized.jpg


You can really see the detail in my gate now.
20230507_184727_resized.jpg


I took this one the next morning as the sun was hitting the hood directly. I almost want to finish it, but since I'm replacing the hood anyway it just seems like a waste of time and money. I just wanted to see if my technique would work on something that needed this much paint correction. I'm VERY happy knowing my technique works on something with this much paint damage.
20230508_092927_resized.jpg
 
Last edited:

wckdvnm

Well-Known Member
Established Member
Joined
Aug 10, 2015
Messages
1,337
Location
Kingman, AZ
According to LMR the Contour fan is good for 3500 CFM. I won't take it as gospel, but I can say it moves a lot of air from when I had them hooked up to the battery charger for testing. I think they're about the same height overall, but having the fans offset will give a little extra room I think.

Two of the reasons I went with the Contour set up is because you can still get them new and because of the shroud. I want something with a shroud to help with airflow.


Those videos are what got the gears turning. I mentioned the Contour fans in one of his comment sections. Eventually I'm going to go with the fan controller since I have the MS3. But I'm trying to figure this out in a stock type set up to hopefully give us another option down the road.

Well since I run the 3 row the contour fans may be what I have to run as the Mark 8 definitely won’t fit behind it. Is it the contour or F-150 fan that can run individual fans separate of each other? Eh no point to derail lol
 

01yellercobra

Well-Known Member
Established Member
Joined
Oct 5, 2005
Messages
21,337
Location
Cali
Well since I run the 3 row the contour fans may be what I have to run as the Mark 8 definitely won’t fit behind it. Is it the contour or F-150 fan that can run individual fans separate of each other? Eh no point to derail lol

My quick measurements show the Contour fans at 3.25" from radiator surface to the back of the motor. Both are the same height. The stock fan is 5".

You can run each one separately or together. Once I have good info I plan on making a thread. I just didn't want to get ahead of myself on it.
 

wckdvnm

Well-Known Member
Established Member
Joined
Aug 10, 2015
Messages
1,337
Location
Kingman, AZ
My quick measurements show the Contour fans at 3.25" from radiator surface to the back of the motor. Both are the same height. The stock fan is 5".

You can run each one separately or together. Once I have good info I plan on making a thread. I just didn't want to get ahead of myself on it.

Ah so it is the contour that can run the fans independent of each other! I read some older forum posts in the fox body days where people would wire them in and some trying to get the single fan for low speed and get both to kick on when high was commanded. Seeing Malcom’s videos on the fans and the fusion PWM, like you had the wheels turning again. But I am way behind the 8 ball getting the car up and running so I can only wait for your write up till then lol.
 

03' White Snake

Well-Known Member
Established Member
Joined
Feb 5, 2007
Messages
3,861
Location
Mass
900hp this time?
That’s my goal on 26 psi. Based on previous sessions I think it’s attainable.

Made 744 on 18 psi last time. Time before made 822 on 22 psi, I have since ported the lower intake, degree’d the cams better and slightly thinner head gaskets. Also put in a Nations Alternator so hopefully no more WOT voltage issues. I seem to hit the dyno on 90+ degree days with high humidity for some reason, so this time it should be cooler too which will help.
 

2003RedfireVert

Male and Female He created them.
Established Member
Joined
Jan 25, 2022
Messages
2,507
Location
Fly over country
That’s my goal on 26 psi. Based on previous sessions I think it’s attainable.

Made 744 on 18 psi last time. Time before made 822 on 22 psi, I have since ported the lower intake, degree’d the cams better and slightly thinner head gaskets. Also put in a Nations Alternator so hopefully no more WOT voltage issues. I seem to hit the dyno on 90+ degree days with high humidity for some reason, so this time it should be cooler too which will help.
Looking forward to seeing the results.
 

01yellercobra

Well-Known Member
Established Member
Joined
Oct 5, 2005
Messages
21,337
Location
Cali
That’s my goal on 26 psi. Based on previous sessions I think it’s attainable.

Made 744 on 18 psi last time. Time before made 822 on 22 psi, I have since ported the lower intake, degree’d the cams better and slightly thinner head gaskets. Also put in a Nations Alternator so hopefully no more WOT voltage issues. I seem to hit the dyno on 90+ degree days with high humidity for some reason, so this time it should be cooler too which will help.
Please get video of it. Good luck dude.
 

01yellercobra

Well-Known Member
Established Member
Joined
Oct 5, 2005
Messages
21,337
Location
Cali
Ah so it is the contour that can run the fans independent of each other! I read some older forum posts in the fox body days where people would wire them in and some trying to get the single fan for low speed and get both to kick on when high was commanded. Seeing Malcom’s videos on the fans and the fusion PWM, like you had the wheels turning again. But I am way behind the 8 ball getting the car up and running so I can only wait for your write up till then lol.
Each fan has its own pigtail. So it wouldn't be too hard to run them independently. I had them running together when I did the quick wiring last weekend. I wanted to make sure my thought process was correct about the wiring. And it they worked as I thought they should.
 

CobraBob

Authorized Vendor
Established Member
Premium Member
Single Barrel Sirs
Joined
Nov 17, 2002
Messages
105,592
Location
Cheshire, CT
Then it was time to bust out my polisher and see the results.

Man, this thing came out just as good as my 65 LOL.

Here you can see how clear the center section reflection is compared to the outside reflection. Passenger side.
View attachment 1793086

Driver's side center section compared to the outside section.
View attachment 1793087

Damn, you can see my ugly mug now LMAO!!! You can even see the hairs on my hand.
View attachment 1793088

I think you can actually count the bricks on my house LOL.
View attachment 1793089

On the bottom of this picture you can actually see the jet stream from an aircraft that was flying overhead. Holy Crap!
View attachment 1793090

View attachment 1793091

You can really see the detail in my gate now.
View attachment 1793092

I took this one the next morning as the sun was hitting the hood directly. I almost want to finish it, but since I'm replacing the hood anyway it just seems like a waste of time and money. I just wanted to see if my technique would work on something that needed this much paint correction. I'm VERY happy knowing my technique works on something with this much paint damage.
View attachment 1793093
You did a darned nice job on the hood, Glenn. Well done!!
 

01yellercobra

Well-Known Member
Established Member
Joined
Oct 5, 2005
Messages
21,337
Location
Cali
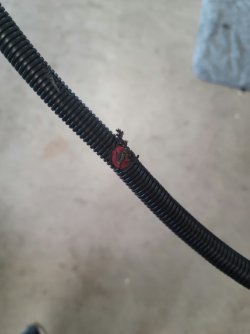
I'd like to volunteer as dumbass of the week for this one. The cover to my megafuse holder fell off somewhere the last time I drove the car. So I ordered a new one and it didn't quite fit where the old one did. After installing everything I ran my hand down the cable and looked with a flashlight. Everything seemed good so I fired it up. Then heard what sounded like weird belt slip. But it went away pretty quick. So I took my time getting out of the car to check things and I heard it again. I looked by the alternator pulley and saw a couple sparks. I moved a lot faster to shut the car off. So the cable got some damage and the pulley was scuffed up.

I'll make another power cable when my new crimp tool arrives. I also took the time to replace the pulley with a smaller one. Which, if I had done before would have still left me plenty of clearance between the pulley and cable. Oh well.
 

Attachments

  • Smaller.jpg
    Smaller.jpg
    113 KB · Views: 58

Black Gold 380R

Multiple SVT Collector
Established Member
Joined
Feb 28, 2008
Messages
5,675
Location
El Paso, TX
I'd like to volunteer as dumbass of the week for this one. The cover to my megafuse holder fell off somewhere the last time I drove the car. So I ordered a new one and it didn't quite fit where the old one did. After installing everything I ran my hand down the cable and looked with a flashlight. Everything seemed good so I fired it up. Then heard what sounded like weird belt slip. But it went away pretty quick. So I took my time getting out of the car to check things and I heard it again. I looked by the alternator pulley and saw a couple sparks. I moved a lot faster to shut the car off. So the cable got some damage and the pulley was scuffed up.

I'll make another power cable when my new crimp tool arrives. I also took the time to replace the pulley with a smaller one. Which, if I had done before would have still left me plenty of clearance between the pulley and cable. Oh well.
Amazing how seeing sparks causes us to move with a sense of urgency eh Bob LOL.

Glad it was nothing worse. You have all the good tools to make it better brother!
 

tporter67

Active Member
Established Member
Joined
Sep 5, 2019
Messages
101
Location
Clemson, South Carolina
I'd like to volunteer as dumbass of the week for this one. The cover to my megafuse holder fell off somewhere the last time I drove the car. So I ordered a new one and it didn't quite fit where the old one did. After installing everything I ran my hand down the cable and looked with a flashlight. Everything seemed good so I fired it up. Then heard what sounded like weird belt slip. But it went away pretty quick. So I took my time getting out of the car to check things and I heard it again. I looked by the alternator pulley and saw a couple sparks. I moved a lot faster to shut the car off. So the cable got some damage and the pulley was scuffed up.

I'll make another power cable when my new crimp tool arrives. I also took the time to replace the pulley with a smaller one. Which, if I had done before would have still left me plenty of clearance between the pulley and cable. Oh well.
I wouldnt change the alternator pulley, id reroute your lines. As long as the alternator doesnt go over 16k rpm at your shift point ur good tho
 

Users who are viewing this thread


Top