You are using an out of date browser. It may not display this or other websites correctly.
You should upgrade or use an alternative browser.
You should upgrade or use an alternative browser.
Heat Exchanger Musings (and what not)
- Thread starter Tob
- Start date
Here's a link to an excellent thread that might help you. Keith's work is always first rate.
C&R HE Install
Thanks for posting that link! I appreciate it
The OE core has a black "coating" on it. And it isn't flat.
I know - but to get the most heat reduction, a very thin coating of flat black is more effective. Not something the factory would go about doing for the return on heat reduction. More paint means more insulation. More effective than a bare core too (although some disagree with that).
The logo looks great in the second photo. They need to give out little badges next to users names for doing how-to write ups. I used yours for the hood vents. The write-ups are a huge help to the community.
Tob when you hook up the tow hook, please take a picture of how it was mounted. Your assistance is appreciated.
Another great write up. Don't worry I was missing the 4th bolt also and mine is an 11. I think someone has saved maybe 1K since 2007 leaving all the bolts out. Ever car I have seen is missing that bolt lol. Wonder how many other bolts are left out of the car that you will never see until you dismantle something.
Tob I don't have pics but it mounts to the crash bar and goes through the honey comb part of the grill... The loop is removable.
:rockon:+1 on adding the original sticker and adding the extra hold-down bolt.
Thanks for the new mods to my car.
Mod Fever never ends.:rockon:
Thanks for the new mods to my car.
Mod Fever never ends.:rockon:
Great write up...as always. Just another reason why I have to keep a laptop in the garage :coolman:
Van...any comments on the benefits of clear coating the HE? I'm wondering if the heat will take it's toll on the paint and/or how to keep it sticking to Aluminum...
Logo looks great though!
Van...any comments on the benefits of clear coating the HE? I'm wondering if the heat will take it's toll on the paint and/or how to keep it sticking to Aluminum...
Logo looks great though!
Van@RevanRacing
Active Member
Great write up...as always. Just another reason why I have to keep a laptop in the garage :coolman:
Van...any comments on the benefits of clear coating the HE? I'm wondering if the heat will take it's toll on the paint and/or how to keep it sticking to Aluminum...
Logo looks great though!
Aluminum with it's natural exposure and corrosion can actually make a radiator or heat exchanger more efficient. :burn: However the trade off is most likely corrosive failure to the core later on.
I'm sure the clear coat and black spray paint are just fine and won't cause any problems as long as the coating isn't too thick and prevents adequate airflow through the heat exchanger fins.
Another Tob project looking good.
Is it necessary to coat the HE with clear? I thought that the aluminum oxide was a good thing as it is a very tight bond and is relatively thin:??:
How do you gauge too much black versus just right:??:
Great pictures and tutorial. I will be doing this on my 2012 and hope that there is not a missing bolt! Do you have the part number for the bolt?
Go have a :beer: and op: you deserve it!
How do you gauge too much black versus just right:??:
Great pictures and tutorial. I will be doing this on my 2012 and hope that there is not a missing bolt! Do you have the part number for the bolt?
Go have a :beer: and
op: you deserve it!nice work... 2nd version much better
Finished mine Saturday


A slight deviation from the core subject, I know, so I'll correlate it to the "and what not" portion from this thread's title. That being, now is the perfect time for some kind of front tow hook. Plus, I was asked.:idea: So deviate I shall!
It was less than a year ago when I sold my complete set of 2010 coupe wheels/tires to fellow SVTP member mblgjr (Matt). I had just picked up a fresh set of '11 PP wheels/tires so I made the switch one afternoon. There was a light dusting of snow falling onto the ground when I rolled the now removed '10 set from my shop to my home garage for clean up prior to boxing and shipping. Man I miss those wheels...

Anyhoo, I had pulled my car out of the barn with its new rolling stock and parked it on the frozen tundra just off to the side of the barn. There was less than an inch of light powder. Didn't matter. I knew I was stuck the moment I stopped moving.

The car would do nothing but slide - zero traction. What was really frustrating was there was no real spot to use for an attachment point for a tow strap. Not in the front or in the rear. I made a mental note at that point to do something. So I started collecting information I could find on the web on tow points on an S197 chassis car.
I noticed that FRPP offered a bumper that had a fabricated attachment point for a hook.

Ford Racing Performance Parts
No longer available as well as requiring the front bumper to be cut for fitment. Cross that one off the list. But it brought to my attention the hook or "loop" that FRPP offered.
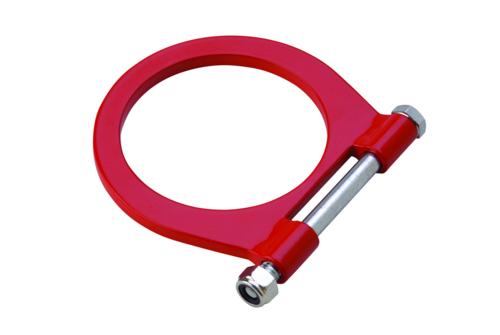
Ford Racing Performance Parts
The loop seemed like a nice enough part. The issue would be how to attach. Then I found a few threads I had passed over either at TS or here. There was a gentleman selling a fabricated bracket that allowed using FRPP's loop and you didn't have to slash through the front bumper to use it. He had a drop bracket fabbed up that would go through the lower grille.


Looked to be fairly robust, as seen on this non-GT500

Here's the bracket being added to a GT500


I'm not exactly big on the single shear attachment bolt-in method, the fact that a side load may cause it to rotate, nor having to trim the lower grille.


I do like the fact that you can simply remove the loop bolt to take the actual loop off w/o having to partially disassemble the front clip to get at it.

I'm considering incorporating a removeable threaded forged eyebolt that could easily thread into a nut that would be flush with the grille and not require cutting it.
If all goes as planned, I'll fire up the plasma cutter at work and whip something up. That is why I'm not finishing the H/E install just yet.
Tob when you hook up the tow hook, please take a picture of how it was mounted. Your assistance is appreciated.
It was less than a year ago when I sold my complete set of 2010 coupe wheels/tires to fellow SVTP member mblgjr (Matt). I had just picked up a fresh set of '11 PP wheels/tires so I made the switch one afternoon. There was a light dusting of snow falling onto the ground when I rolled the now removed '10 set from my shop to my home garage for clean up prior to boxing and shipping. Man I miss those wheels...
Anyhoo, I had pulled my car out of the barn with its new rolling stock and parked it on the frozen tundra just off to the side of the barn. There was less than an inch of light powder. Didn't matter. I knew I was stuck the moment I stopped moving.
The car would do nothing but slide - zero traction. What was really frustrating was there was no real spot to use for an attachment point for a tow strap. Not in the front or in the rear. I made a mental note at that point to do something. So I started collecting information I could find on the web on tow points on an S197 chassis car.
I noticed that FRPP offered a bumper that had a fabricated attachment point for a hook.
Ford Racing Performance Parts
No longer available as well as requiring the front bumper to be cut for fitment. Cross that one off the list. But it brought to my attention the hook or "loop" that FRPP offered.
Ford Racing Performance Parts
The loop seemed like a nice enough part. The issue would be how to attach. Then I found a few threads I had passed over either at TS or here. There was a gentleman selling a fabricated bracket that allowed using FRPP's loop and you didn't have to slash through the front bumper to use it. He had a drop bracket fabbed up that would go through the lower grille.
Looked to be fairly robust, as seen on this non-GT500
Here's the bracket being added to a GT500
I'm not exactly big on the single shear attachment bolt-in method, the fact that a side load may cause it to rotate, nor having to trim the lower grille.
I do like the fact that you can simply remove the loop bolt to take the actual loop off w/o having to partially disassemble the front clip to get at it.
I'm considering incorporating a removeable threaded forged eyebolt that could easily thread into a nut that would be flush with the grille and not require cutting it.
If all goes as planned, I'll fire up the plasma cutter at work and whip something up. That is why I'm not finishing the H/E install just yet.
Great idea! If you sell them, I'd buy one.
Steve
Looks great
Thanks Mike.
I'm finding out that coming up with any type of anchoring point for a loop or hook that doesn't penetrate the bumper or require trimming the lower grille is a bit of a challenge, especially with simple raw material laying around.
I'll see what I can whip up today up until the Patriots/Bills massacre cuts me short.
Cool, in the meantime I'll be reading your Whipple install thread!
Im afraid I'm about to spend some $$
Im afraid I'm about to spend some $$
Users who are viewing this thread
Total: 4 (members: 0, guests: 4)

